Orchestration for Machine Learning
Repository

Subscribe to our newsletter
📬 Receive new lessons straight to your inbox (once a month) and join 40K+ developers in learning how to responsibly deliver value with ML.
Intuition
So far we've implemented our DataOps (ELT, validation, etc.) and MLOps (optimization, training, evaluation, etc.) workflows as Python function calls. This has worked well since our dataset is static and small. But happens when we need to:
- schedule these workflows as new data arrives?
- scale these workflows as our data grows?
- share these workflows to downstream applications?
- monitor these workflows?
We'll need to break down our end-to-end ML pipeline into individual workflows that can be orchestrated as needed. There are several tools that can help us so this such as Airflow, Prefect, Dagster, Luigi, Orchest and even some ML focused options such as Metaflow, Flyte, KubeFlow Pipelines, Vertex pipelines, etc. We'll be creating our workflows using AirFlow for its:
- wide adoption of the open source platform in industry
- Python based software development kit (SDK)
- ability to run locally and scale easily
- maturity over the years and part of the apache ecosystem
We'll be running Airflow locally but we can easily scale it by running on a managed cluster platform where we can run Python, Hadoop, Spark, etc. on large batch processing jobs (AWS EMR, Google Cloud's Dataproc, on-prem hardware, etc.).
Airflow
Before we create our specific pipelines, let's understand and implement Airflow's overarching concepts that will allow us to "author, schedule, and monitor workflows".
Separate repository
Our work in this lesson will live in a separate repository so create a new directory (outside our mlops-course repository) called data-engineering. All the work in this lesson can be found in our data-engineering repository.
Set up
To install and run Airflow, we can either do so locally or with Docker. If using docker-compose to run Airflow inside Docker containers, we'll want to allocate at least 4 GB in memory.
# Configurations
export AIRFLOW_HOME=${PWD}/airflow
AIRFLOW_VERSION=2.3.3
PYTHON_VERSION="$(python --version | cut -d " " -f 2 | cut -d "." -f 1-2)"
CONSTRAINT_URL="https://raw.githubusercontent.com/apache/airflow/constraints-${AIRFLOW_VERSION}/constraints-${PYTHON_VERSION}.txt"

# Install Airflow (may need to upgrade pip)
pip install "apache-airflow==${AIRFLOW_VERSION}" --constraint "${CONSTRAINT_URL}"

# Initialize DB (SQLite by default)
airflow db init
This will create an airflow directory with the following components:
airflow/
├── logs/
├── airflow.cfg
├── airflow.db
├── unittests.cfg
└── webserver_config.py
We're going to edit the airflow.cfg file to best fit our needs:
# Inside airflow.cfg
enable_xcom_pickling = True  # needed for Great Expectations airflow provider
load_examples = False  # don't clutter webserver with examples
And we'll perform a reset to implement these configuration changes.
airflow db reset -y
Now we're ready to initialize our database with an admin user, which we'll use to login to access our workflows in the webserver.
# We'll be prompted to enter a password
airflow users create \
    --username admin \
    --firstname FIRSTNAME \
    --lastname LASTNAME \
    --role Admin \
    --email EMAIL
Webserver
Once we've created a user, we're ready to launch the webserver and log in using our credentials.
# Launch webserver
source venv/bin/activate
export AIRFLOW_HOME=${PWD}/airflow
airflow webserver --port 8080  # http://localhost:8080
The webserver allows us to run and inspect workflows, establish connections to external data storage, manager users, etc. through a UI. Similarly, we could also use Airflow's REST API or Command-line interface (CLI) to perform the same operations. However, we'll be using the webserver because it's convenient to visually inspect our workflows.
We'll explore the different components of the webserver as we learn about Airflow and implement our workflows.
Scheduler
Next, we need to launch our scheduler, which will execute and monitor the tasks in our workflows. The schedule executes tasks by reading from the metadata database and ensures the task has what it needs to finish running. We'll go ahead and execute the following commands on the separate terminal window:
# Launch scheduler (in separate terminal)
source venv/bin/activate
export AIRFLOW_HOME=${PWD}/airflow
export OBJC_DISABLE_INITIALIZE_FORK_SAFETY=YES
airflow scheduler
Executor
As our scheduler reads from the metadata database, the executor determines what worker processes are necessary for the task to run to completion. Since our default database SQLlite, which can't support multiple connections, our default executor is the Sequential Executor. However, if we choose a more production-grade database option such as PostgresSQL or MySQL, we can choose scalable Executor backends Celery, Kubernetes, etc. For example, running Airflow with Docker uses PostgresSQL as the database and so uses the Celery Executor backend to run tasks in parallel.
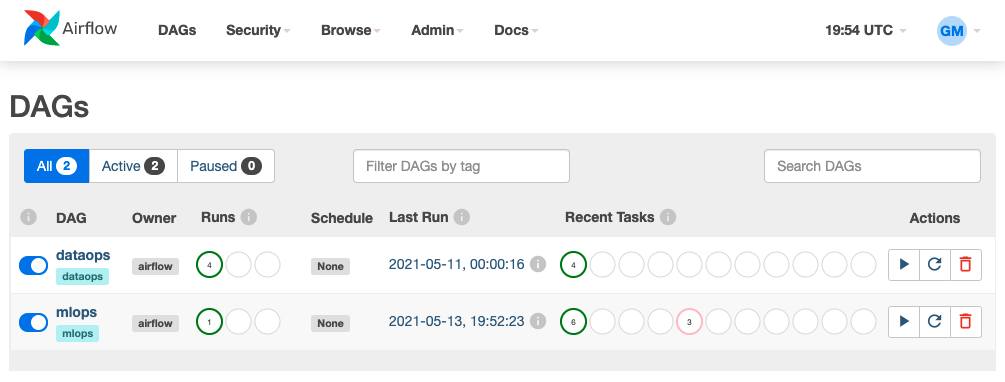
DAGs
Workflows are defined by directed acyclic graphs (DAGs), whose nodes represent tasks and edges represent the data flow relationship between the tasks. Direct and acyclic implies that workflows can only execute in one direction and a previous, upstream task cannot run again once a downstream task has started.
DAGs can be defined inside Python workflow scripts inside the airflow/dags directory and they'll automatically appear (and continuously be updated) on the webserver. Before we start creating our DataOps and MLOps workflows, we'll learn about Airflow's concepts via an example DAG outlined in airflow/dags/example.py. Execute the following commands in a new (3rd) terminal window:
mkdir airflow/dags
touch airflow/dags/example.py
Inside each workflow script, we can define some default arguments that will apply to all DAGs within that workflow.
1 2 3 4 | |
Typically, our DAGs are not the only ones running in an Airflow cluster. However, it can be messy and sometimes impossible to execute different workflows when they require different resources, package versions, etc. For teams with multiple projects, it’s a good idea to use something like the KubernetesPodOperator to execute each job using an isolated docker image.
We can initialize DAGs with many parameters (which will override the same parameters in default_args) and in several different ways:
-
using a with statement
 1
 2
 3
 4
 5
 6
 7
 8
 9
10
11
12
from airflow import DAG with DAG( dag_id="example", description="Example DAG", default_args=default_args, schedule_interval=None, start_date=days_ago(2), tags=["example"], ) as example: # Define tasks pass -
using the dag decorator
 1
 2
 3
 4
 5
 6
 7
 8
 9
10
11
12
13
from airflow.decorators import dag

@dag(
    dag_id="example",
    description="Example DAG",
    default_args=default_args,
    schedule_interval=None,
    start_date=days_ago(2),
    tags=["example"],
)
def example():
    # Define tasks
    pass
There are many parameters that we can initialize our DAGs with, including a
start_dateand aschedule_interval. While we could have our workflows execute on a temporal cadence, many ML workflows are initiated by events, which we can map using sensors and hooks to external databases, file systems, etc.
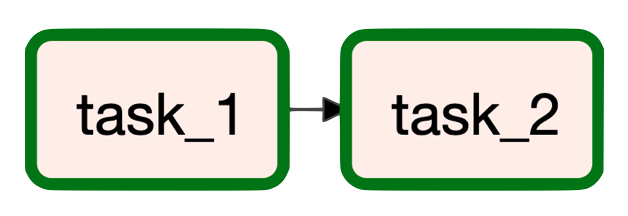
Tasks
Tasks are the operations that are executed in a workflow and are represented by nodes in a DAG. Each task should be a clearly defined single operation and it should be idempotent, which means we can execute it multiple times and expect the same result and system state. This is important in the event we need to retry a failed task and don't have to worry about resetting the state of our system. Like DAGs, there are several different ways to implement tasks:
-
using the task decorator
 1
 2
 3
 4
 5
 6
 7
 8
 9
10
11
12
13
14
15
16
17
18
from airflow.decorators import dag, task from airflow.utils.dates import days_ago @dag( dag_id="example", description="Example DAG with task decorators", default_args=default_args, schedule_interval=None, start_date=days_ago(2), tags=["example"], ) def example(): @task def task_1(): return 1 @task def task_2(x): return x+1 -
using Operators
 1
 2
 3
 4
 5
 6
 7
 8
 9
10
11
12
13
14
15
16
from airflow.decorators import dag
from airflow.operators.bash_operator import BashOperator
from airflow.utils.dates import days_ago

@dag(
    dag_id="example",
    description="Example DAG with Operators",
    default_args=default_args,
    schedule_interval=None,
    start_date=days_ago(2),
    tags=["example"],
)
def example():
    # Define tasks
    task_1 = BashOperator(task_id="task_1", bash_command="echo 1")
    task_2 = BashOperator(task_id="task_2", bash_command="echo 2")
Though the graphs are directed, we can establish certain trigger rules for each task to execute on conditional successes or failures of the parent tasks.
Operators
The first method of creating tasks involved using Operators, which defines what exactly the task will be doing. Airflow has many built-in Operators such as the BashOperator or PythonOperator, which allow us to execute bash and Python commands respectively.
1 2 3 4 5 6 7 8 9 10 | |
There are also many other Airflow native Operators (email, S3, MySQL, Hive, etc.), as well as community maintained provider packages (Kubernetes, Snowflake, Azure, AWS, Salesforce, Tableau, etc.), to execute tasks specific to certain platforms or tools.
We can also create our own custom Operators by extending the BashOperator class.
Relationships
Once we've defined our tasks using Operators or as decorated functions, we need to define the relationships between them (edges). The way we define the relationships depends on how our tasks were defined:
-
using decorated functions
1
2
3
# Task relationships x = task_1() y = task_2(x=x) -
using Operators
1
2
3
# Task relationships
task_1 >> task_2  # same as task_1.set_downstream(task_2) or
                  # task_2.set_upstream(task_1)
In both scenarios, we'll setting task_2 as the downstream task to task_1.
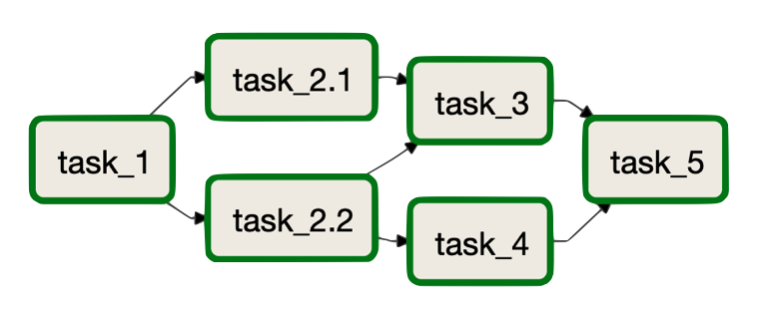
Note
We can even create intricate DAGs by using these notations to define the relationships.
1 2 3 | |
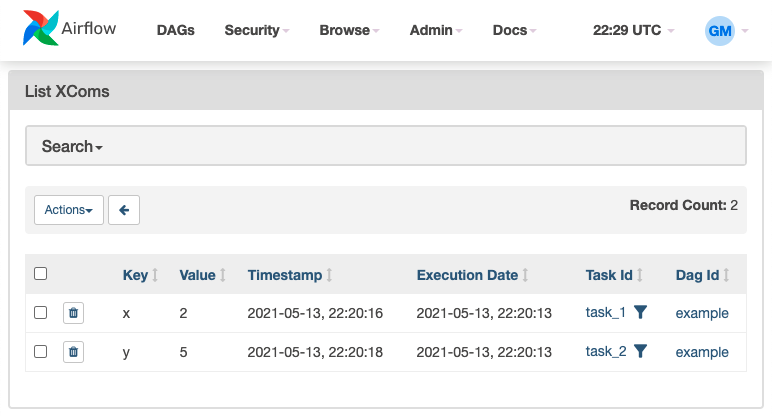
XComs
When we use task decorators, we can see how values can be passed between tasks. But, how can we pass values when using Operators? Airflow uses XComs (cross communications) objects, defined with a key, value, timestamp and task_id, to push and pull values between tasks. When we use decorated functions, XComs are being used under the hood but it's abstracted away, allowing us to pass values amongst Python functions seamlessly. But when using Operators, we'll need to explicitly push and pull the values as we need it.
1 2 3 4 5 6 7 8 9 10 11 12 13 14 15 16 17 18 19 20 21 22 | |
We can also view our XComs on the webserver by going to Admin >> XComs:
Warning
The data we pass between tasks should be small (metadata, metrics, etc.) because Airflow's metadata database is not equipped to hold large artifacts. However, if we do need to store and use the large results of our tasks, it's best to use an external data storage (blog storage, model registry, etc.) and perform heavy processing using Spark or inside data systems like a data warehouse.
DAG runs
Once we've defined the tasks and their relationships, we're ready to run our DAGs. We'll start defining our DAG like so:
1 2 3 | |
The new DAG will have appeared when we refresh our Airflow webserver.
Manual
Our DAG is initially paused since we specified dags_are_paused_at_creation = True inside our airflow.cfg configuration, so we'll have to manually execute this DAG by clicking on it > unpausing it (toggle) > triggering it (button). To view the logs for any of the tasks in our DAG run, we can click on the task > Log.

Note
We could also use Airflow's REST API (will configured authorization) or Command-line interface (CLI) to inspect and trigger workflows (and a whole lot more). Or we could even use the trigger_dagrun Operator to trigger DAGs from within another workflow.
# CLI to run dags
airflow dags trigger <DAG_ID>
Interval
Had we specified a start_date and schedule_interval when defining the DAG, it would have have automatically executed at the appropriate times. For example, the DAG below will have started two days ago and will be triggered at the start of every day.
1 2 3 4 5 6 7 8 9 10 11 12 | |
Warning
Depending on the start_date and schedule_interval, our workflow should have been triggered several times and Airflow will try to catchup to the current time. We can avoid this by setting catchup=False when defining the DAG. We can also set this configuration as part of the default arguments:
1 2 3 4 | |
However, if we did want to run particular runs in the past, we can manually backfill what we need.
We could also specify a cron expression for our schedule_interval parameter or even use cron presets.
Airflow's Scheduler will run our workflows one
schedule_intervalfrom thestart_date. For example, if we want our workflow to start on01-01-1983and run@daily, then the first run will be immediately after01-01-1983T11:59.
Sensors
While it may make sense to execute many data processing workflows on a scheduled interval, machine learning workflows may require more nuanced triggers. We shouldn't be wasting compute by running executing our workflows just in case we have new data. Instead, we can use sensors to trigger workflows when some external condition is met. For example, we can initiate data processing when a new batch of annotated data appears in a database or when a specific file appears in a file system, etc.
There's so much more to Airflow (monitoring, Task groups, smart senors, etc.) so be sure to explore them as you need them by using the official documentation.
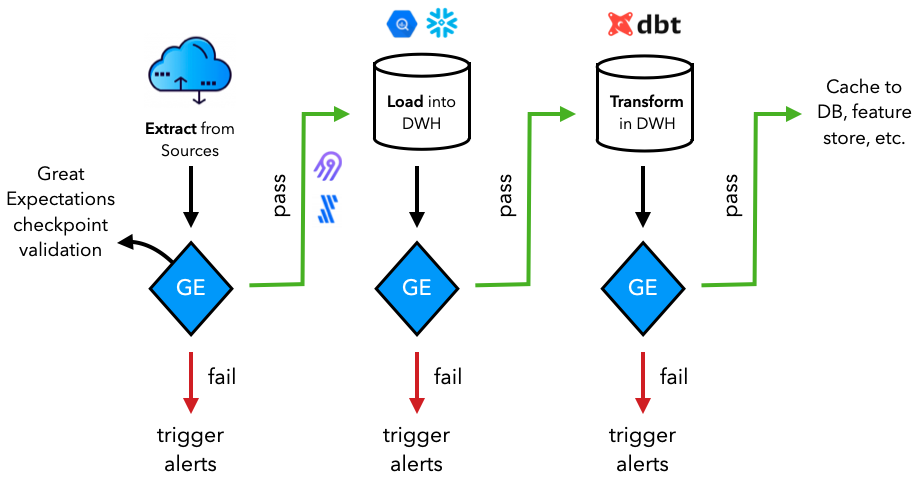
DataOps
Now that we've reviewed Airflow's major concepts, we're ready to create the DataOps workflows. It's the exact same workflow we defined in our data stack lesson -- extract, load and transform -- but this time we'll be doing everything programmatically and orchestrating it with Airflow.
We'll start by creating the script where we'll define our workflows:
touch airflow/dags/workflows.py
1 2 3 4 5 6 7 8 9 10 11 12 13 14 15 16 17 18 19 20 21 22 23 24 25 | |
In two separate terminals, activate the virtual environment and spin up the Airflow webserver and scheduler:
# Airflow webserver
source venv/bin/activate
export AIRFLOW_HOME=${PWD}/airflow
export GOOGLE_APPLICATION_CREDENTIALS=/Users/goku/Downloads/made-with-ml-XXXXXX-XXXXXXXXXXXX.json # REPLACE
airflow webserver --port 8080
# Go to http://localhost:8080
# Airflow scheduler
source venv/bin/activate
export AIRFLOW_HOME=${PWD}/airflow
export OBJC_DISABLE_INITIALIZE_FORK_SAFETY=YES
export GOOGLE_APPLICATION_CREDENTIALS=~/Downloads/made-with-ml-XXXXXX-XXXXXXXXXXXX.json # REPLACE
airflow scheduler
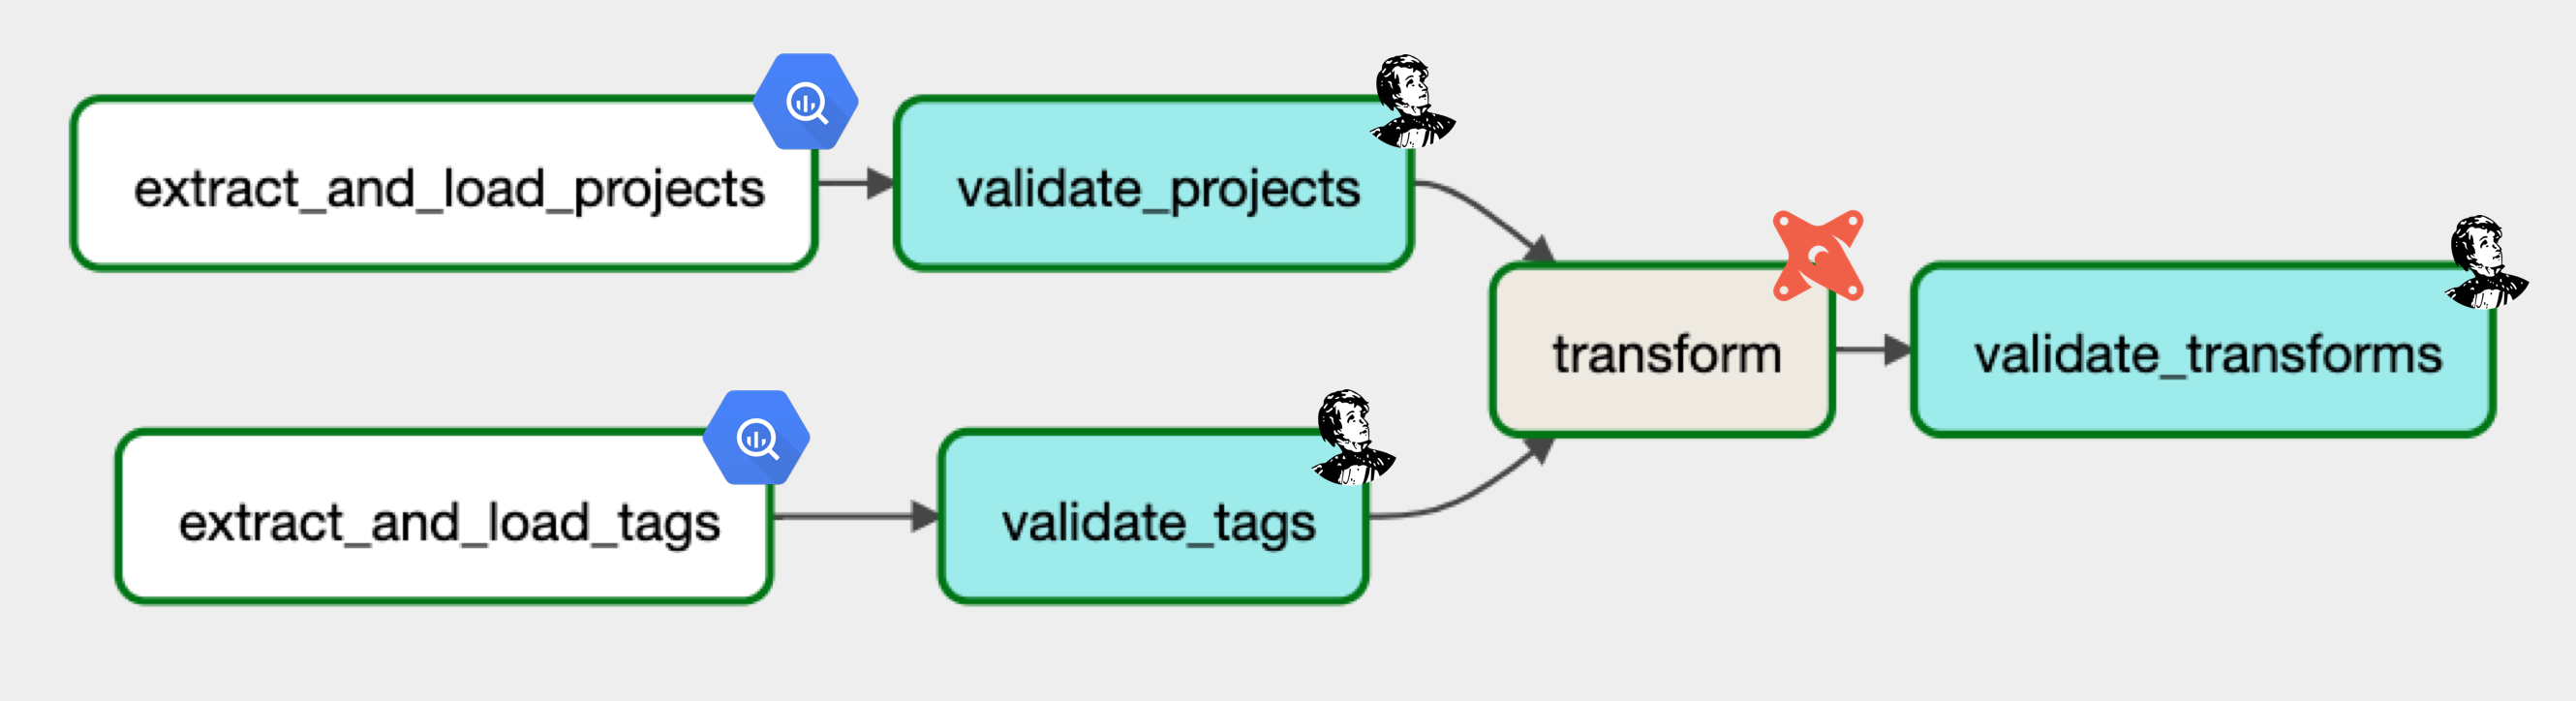
Extract and load
We're going to use the Airbyte connections we set up in our data-stack lesson but this time we're going to programmatically trigger the data syncs with Airflow. First, let's ensure that Airbyte is running on a separate terminal in it's repository:
git clone https://github.com/airbytehq/airbyte.git  # skip if already create in data-stack lesson
cd airbyte
docker-compose up
Next, let's install the required packages and establish the connection between Airbyte and Airflow:
pip install apache-airflow-providers-airbyte==3.1.0
- Go to the Airflow webserver and click
Admin>Connections> ➕ - Add the connection with the following details:
Connection ID: airbyte
Connection Type: HTTP
Host: localhost
Port: 8000
We could also establish connections programmatically but it’s good to use the UI to understand what’s happening under the hood.
In order to execute our extract and load data syncs, we can use the AirbyteTriggerSyncOperator:
1 2 3 4 5 6 7 8 9 10 11 12 13 14 15 16 17 18 19 20 21 22 23 24 | |
We can find the connection_id for each Airbyte connection by:
- Go to our Airbyte webserver and click
Connectionson the left menu. - Click on the specific connection we want to use and the URL should be like this:
https://demo.airbyte.io/workspaces/<WORKSPACE_ID>/connections/<CONNECTION_ID>/status - The string in the
CONNECTION_IDposition is the connection's id.
We can trigger our DAG right now and view the extracted data be loaded into our BigQuery data warehouse but we'll continue developing and execute our DAG once the entire DataOps workflow has been defined.
Validate
The specific process of where and how we extract our data can be bespoke but what's important is that we have validation at every step of the way. We'll once again use Great Expectations, as we did in our testing lesson, to validate our extracted and loaded data before transforming it.
With the Airflow concepts we've learned so far, there are many ways to use our data validation library to validate our data. Regardless of what data validation tool we use (ex. Great Expectations, TFX, AWS Deequ, etc.) we could use the BashOperator, PythonOperator, etc. to run our tests. However, Great Expectations has a Airflow Provider package to make it even easier to validate our data. This package contains a GreatExpectationsOperator which we can use to execute specific checkpoints as tasks.
pip install airflow-provider-great-expectations==0.1.1 great-expectations==0.15.19
great_expectations init
This will create the following directory within our data-engineering repository:
tests/great_expectations/
├── checkpoints/
├── expectations/
├── plugins/
├── uncommitted/
├── .gitignore
└── great_expectations.yml
Data source
But first, before we can create our tests, we need to define a new datasource within Great Expectations for our Google BigQuery data warehouse. This will require several packages and exports:
pip install pybigquery==0.10.2 sqlalchemy_bigquery==1.4.4
export GOOGLE_APPLICATION_CREDENTIALS=/Users/goku/Downloads/made-with-ml-XXXXXX-XXXXXXXXXXXX.json  # REPLACE
great_expectations datasource new
What data would you like Great Expectations to connect to?
    1. Files on a filesystem (for processing with Pandas or Spark)
    2. Relational database (SQL) 👈
What are you processing your files with?
1. MySQL
2. Postgres
3. Redshift
4. Snowflake
5. BigQuery 👈
6. other - Do you have a working SQLAlchemy connection string?
This will open up an interactive notebook where we can fill in the following details:
datasource_name = “dwh"
connection_string = “bigquery://made-with-ml-359923/mlops_course”
Suite
Next, we can create a suite of expectations for our data assets:
great_expectations suite new
How would you like to create your Expectation Suite?
    1. Manually, without interacting with a sample batch of data (default)
    2. Interactively, with a sample batch of data 👈
    3. Automatically, using a profiler
Select a datasource
    1. dwh 👈
Which data asset (accessible by data connector "default_inferred_data_connector_name") would you like to use?
    1. mlops_course.projects 👈
    2. mlops_course.tags
Name the new Expectation Suite [mlops.projects.warning]: projects
This will open up an interactive notebook where we can define our expectations. Repeat the same for creating a suite for our tags data asset as well.
Expectations for mlops_course.projects
Table expectations
1 2 | |
Column expectations:
1 2 3 4 5 6 7 8 9 10 11 12 13 | |
Expectations for mlops_course.tags
Column expectations:
1 2 3 4 5 6 | |
Checkpoints
Once we have our suite of expectations, we're ready to check checkpoints to execute these expectations:
great_expectations checkpoint new projects
This will, of course, open up an interactive notebook. Just ensure that the following information is correct (the default values may not be):
datasource_name: dwh
data_asset_name: mlops_course.projects
expectation_suite_name: projects
And repeat the same for creating a checkpoint for our tags suite.
Tasks
With our checkpoints defined, we're ready to apply them to our data assets in our warehouse.
1 2 3 4 5 6 7 8 9 10 11 12 13 14 15 16 17 18 19 20 21 | |
Transform
Once we've validated our extracted and loaded data, we're ready to transform it. Our DataOps workflows are not specific to any particular downstream application so the transformation must be globally relevant (ex. cleaning missing data, aggregation, etc.). Just like in our data stack lesson, we're going to use dbt to transform our data. However, this time, we're going to do everything programmatically using the open-source dbt-core package.
In the root of our data-engineering repository, initialize our dbt directory with the following command:
dbt init dbf_transforms
Which database would you like to use?
[1] bigquery 👈
Desired authentication method option:
[1] oauth
[2] service_account 👈
keyfile: /Users/goku/Downloads/made-with-ml-XXXXXX-XXXXXXXXXXXX.json  # REPLACE
project (GCP project id): made-with-ml-XXXXXX  # REPLACE
dataset: mlops_course
threads: 1
job_execution_timeout_seconds: 300
Desired location option:
[1] US  👈  # or what you picked when defining your dataset in Airbyte DWH destination setup
[2] EU
Models
We'll prepare our dbt models as we did using the dbt Cloud IDE in the previous lesson.
cd dbt_transforms
rm -rf models/example
mkdir models/labeled_projects
touch models/labeled_projects/labeled_projects.sql
touch models/labeled_projects/schema.yml
and add the following code to our model files:
1 2 3 4 5 | |
1 2 3 4 5 6 7 8 9 10 11 12 13 14 15 16 17 18 19 20 21 22 23 24 25 | |
And we can use the BashOperator to execute our dbt commands like so:
1 2 3 4 5 6 7 8 9 10 11 12 | |
Programmatically using dbt Cloud
While we developed locally, we could just as easily use Airflow’s dbt cloud provider to connect to our dbt cloud and use the different operators to schedule jobs. This is recommended for production because we can design jobs with proper environment, authentication, schemas, etc.
- Connect Airflow with dbt Cloud:
Go to Admin > Connections > +
Connection ID: dbt_cloud_default
Connection Type: dbt Cloud
Account ID: View in URL of https://cloud.getdbt.com/
API Token: View in https://cloud.getdbt.com/#/profile/api/
- Transform
pip install apache-airflow-providers-dbt-cloud==2.1.0
1 2 3 4 5 6 7 8 | |
Validate
And of course, we'll want to validate our transformations beyond dbt's built-in methods, using great expectations. We'll create a suite and checkpoint as we did above for our projects and tags data assets.
great_expectations suite new # for mlops_course.labeled_projects
Expectations for mlops_course.labeled_projects
Table expectations
1 2 | |
Column expectations:
1 2 3 4 5 6 7 8 9 10 11 12 13 14 15 16 17 | |
great_expectations checkpoint new labeled_projects
datasource_name: dwh
data_asset_name: mlops_course.labeled_projects
expectation_suite_name: labeled_projects
and just like how we added the validation task for our extracted and loaded data, we can do the same for our transformed data in Airflow:
1 2 3 4 5 6 7 8 9 10 11 12 13 14 15 16 | |
Now we have our entire DataOps DAG define and executing it will prepare our data from extraction to loading to transformation (and with validation at every step of the way) for downstream applications.
Typically we'll use sensors to trigger workflows when a condition is met or trigger them directly from the external source via API calls, etc. For our ML use cases, this could be at regular intervals or when labeling or monitoring workflows trigger retraining, etc.
MLOps
Once we have our data prepared, we're ready to create one of the many potential downstream applications that will depend on it. Let's head back to our mlops-course project and follow the same set up instructions for Airflow (you can stop the Airflow webserver and scheduler from our data-engineering project since we'll reuse PORT 8000).
# Airflow webserver
source venv/bin/activate
export AIRFLOW_HOME=${PWD}/airflow
export GOOGLE_APPLICATION_CREDENTIALS=/Users/goku/Downloads/made-with-ml-XXXXXX-XXXXXXXXXXXX.json # REPLACE
airflow webserver --port 8080
# Go to http://localhost:8080
# Airflow scheduler
source venv/bin/activate
export AIRFLOW_HOME=${PWD}/airflow
export OBJC_DISABLE_INITIALIZE_FORK_SAFETY=YES
export GOOGLE_APPLICATION_CREDENTIALS=~/Downloads/made-with-ml-XXXXXX-XXXXXXXXXXXX.json # REPLACE
airflow scheduler
touch airflow/dags/workflows.py
1 2 3 4 5 6 7 8 9 10 11 12 13 14 15 16 17 18 19 20 21 22 23 24 25 | |
Dataset
We already had an tagifai.elt_data function defined to prepare our data but if we want to leverage the data inside our data warehouse, we'll want to connect to it.
pip install google-cloud-bigquery==1.21.0
1 2 3 4 5 6 7 8 9 10 11 12 13 14 15 16 17 18 19 20 21 22 23 24 25 26 27 28 29 30 31 32 33 34 35 36 37 38 39 | |
Validate
Next, we'll use Great Expectations to validate our data. Even though we've already validated our data, it's a best practice to test for data quality whenever there is a hand-off of data from one place to another. We've already created a checkpoint for our labeled_projects in our testing lesson so we'll just leverage that inside our MLOps DAG.
pip install airflow-provider-great-expectations==0.1.1 great-expectations==0.15.19
1 2 3 4 5 6 7 8 9 10 11 12 13 14 15 16 17 18 19 20 21 | |
Train
Finally, we'll optimize and train a model using our validated data.
1 2 3 4 5 6 7 8 9 10 11 12 13 14 15 16 17 18 19 20 21 22 23 24 25 26 | |
And with that we have our MLOps workflow defined that uses the prepared data from our DataOps workflow. At this point, we can add additional tasks for offline/online evaluation, deployment, etc. with the same process as above.

Continual learning
The DataOps and MLOps workflows connect to create an ML system that's capable of continually learning. Such a system will guide us with when to update, what exactly to update and how to update it (easily).
We use the word continual (repeat with breaks) instead of continuous (repeat without interruption / intervention) because we're not trying to create a system that will automatically update with new incoming data without human intervention.
Monitoring
Our production system is live and monitored. When an event of interest occurs (ex. drift), one of several events needs to be triggered:
continue: with the currently deployed model without any updates. However, an alert was raised so it should analyzed later to reduce false positive alerts.improve: by retraining the model to avoid performance degradation causes by meaningful drift (data, target, concept, etc.).inspect: to make a decision. Typically expectations are reassessed, schemas are reevaluated for changes, slices are reevaluated, etc.rollback: to a previous version of the model because of an issue with the current deployment. Typically these can be avoided using robust deployment strategies (ex. dark canary).
Retraining
If we need to improve on the existing version of the model, it's not just the matter of fact of rerunning the model creation workflow on the new dataset. We need to carefully compose the training data in order to avoid issues such as catastrophic forgetting (forget previously learned patterns when presented with new data).
labeling: new incoming data may need to be properly labeled before being used (we cannot just depend on proxy labels).active learning: we may not be able to explicitly label every single new data point so we have to leverage active learning workflows to complete the labeling process.QA: quality assurance workflows to ensure that labeling is accurate, especially for known false positives/negatives and historically poorly performing slices of data.augmentation: increasing our training set with augmented data that's representative of the original dataset.sampling: upsampling and downsampling to address imbalanced data slices.evaluation: creation of an evaluation dataset that's representative of what the model will encounter once deployed.
Once we have the proper dataset for retraining, we can kickoff the workflows to update our system!
Upcoming live cohorts
Sign up for our upcoming live cohort, where we'll provide live lessons + QA, compute (GPUs) and community to learn everything in one day.
To cite this content, please use:
1 2 3 4 5 6 | |