Testing Machine Learning Systems: Code, Data and Models

Subscribe to our newsletter
📬 Receive new lessons straight to your inbox (once a month) and join 40K+ developers in learning how to responsibly deliver value with ML.
Intuition
In this lesson, we'll learn how to test code, data and machine learning models to construct a machine learning system that we can reliably iterate on. Tests are a way for us to ensure that something works as intended. We're incentivized to implement tests and discover sources of error as early in the development cycle as possible so that we can decrease downstream costs and wasted time. Once we've designed our tests, we can automatically execute them every time we change or add to our codebase.
Tip
We highly recommend that you explore this lesson after completing the previous lessons since the topics (and code) are iteratively developed. We did, however, create the testing-ml repository for a quick overview with an interactive notebook.
Types of tests
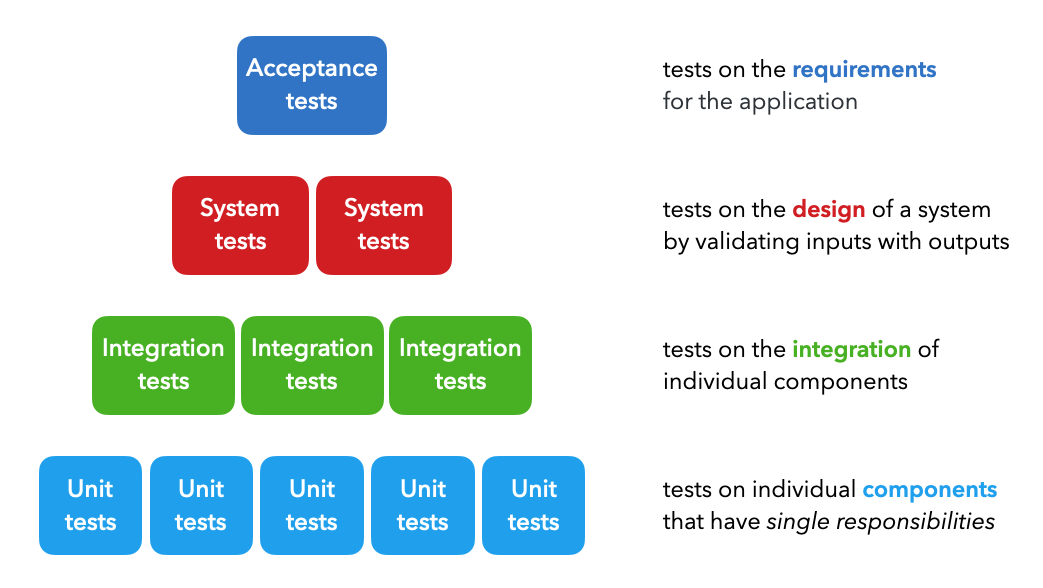
There are four majors types of tests which are utilized at different points in the development cycle:
Unit tests: tests on individual components that each have a single responsibility (ex. function that filters a list).Integration tests: tests on the combined functionality of individual components (ex. data processing).System tests: tests on the design of a system for expected outputs given inputs (ex. training, inference, etc.).Acceptance tests: tests to verify that requirements have been met, usually referred to as User Acceptance Testing (UAT).Regression tests: tests based on errors we've seen before to ensure new changes don't reintroduce them.
While ML systems are probabilistic in nature, they are composed of many deterministic components that can be tested in a similar manner as traditional software systems. The distinction between testing ML systems begins when we move from testing code to testing the data and models.
There are many other types of functional and non-functional tests as well, such as smoke tests (quick health checks), performance tests (load, stress), security tests, etc. but we can generalize all of these under the system tests above.
How should we test?
The framework to use when composing tests is the Arrange Act Assert methodology.
Arrange: set up the different inputs to test on.Act: apply the inputs on the component we want to test.Assert: confirm that we received the expected output.
Cleaningis an unofficial fourth step to this methodology because it's important to not leave remnants of a previous test which may affect subsequent tests. We can use packages such as pytest-randomly to test against state dependency by executing tests randomly.
In Python, there are many tools, such as unittest, pytest, etc. that allow us to easily implement our tests while adhering to the Arrange Act Assert framework. These tools come with powerful built-in functionality such as parametrization, filters, and more, to test many conditions at scale.
What should we test?
When arranging our inputs and asserting our expected outputs, what are some aspects of our inputs and outputs that we should be testing for?
- inputs: data types, format, length, edge cases (min/max, small/large, etc.)
- outputs: data types, formats, exceptions, intermediary and final outputs
👉 We'll cover specific details pertaining to what to test for regarding our data and models below.
Best practices
Regardless of the framework we use, it's important to strongly tie testing into the development process.
atomic: when creating functions and classes, we need to ensure that they have a single responsibility so that we can easily test them. If not, we'll need to split them into more granular components.compose: when we create new components, we want to compose tests to validate their functionality. It's a great way to ensure reliability and catch errors early on.reuse: we should maintain central repositories where core functionality is tested at the source and reused across many projects. This significantly reduces testing efforts for each new project's code base.regression: we want to account for new errors we come across with a regression test so we can ensure we don't reintroduce the same errors in the future.coverage: we want to ensure 100% coverage for our codebase. This doesn't mean writing a test for every single line of code but rather accounting for every single line.automate: in the event we forget to run our tests before committing to a repository, we want to auto run tests when we make changes to our codebase. We'll learn how to do this locally using pre-commit hooks and remotely via GitHub actions in subsequent lessons.
Implementation
In our codebase, we'll be testing the code, data and models.
tests/
├── code/
│   ├── conftest.py
│   ├── test_data.py
│   ├── test_predict.py
│   ├── test_train.py
│   ├── test_tune.py
│   ├── test_utils.py
│   └── utils.py
├── data/
│   ├── conftest.py
│   └── test_dataset.py
└── models/
│   ├── conftest.py
│   └── test_behavioral.py
Note that we aren't testing
evaluate.pyandserve.pybecause it involves complicated testing that's based on the data and models. We'll be testing these components as part of our integration tests when we test our system end-to-end.
💻 Code
We'll start by testing our code and we'll use pytest as our testing framework for it's powerful builtin features such as parametrization, fixtures, markers and more.
Configuration
Pytest expects tests to be organized under a tests directory by default. However, we can also add to our existing pyproject.toml file to configure any other test directories as well. Once in the directory, pytest looks for python scripts starting with tests_*.py but we can configure it to read any other file patterns as well.
1 2 3 4 | |
Assertions
Let's see what a sample test and it's results look like. Assume we have a simple function that decodes a list of indices into their respective classes using a dictionary mapping.
1 2 3 | |
To test this function, we can use assert statements to map inputs with expected outputs. The statement following the word assert must return True.
1 2 3 4 5 6 | |
We can also have assertions about exceptions like we do in lines 6-8 where all the operations under the with statement are expected to raise the specified exception.
Execution
We can execute our tests above using several different levels of granularity:
python3 -m pytest                                          # all tests
python3 -m pytest tests/code                               # tests under a directory
python3 -m pytest tests/code/test_predict.py               # tests for a single file
python3 -m pytest tests/code/test_predict.py::test_decode  # tests for a single function
Running our specific test above would produce the following output:
python3 -m pytest tests/code/test_predict.py::test_decode --verbose --disable-warnings
tests/code/test_predict.py::test_decode PASSED [100%]
Had any of our assertions in this test failed, we would see the failed assertions, along with the expected and actual output from our function.
tests/code/test_predict.py::test_decode FAILED                          [100%]

    def test_decode():
        decoded = predict.decode(
            indices=[0, 1, 1],
            index_to_class={0: "x", 1: "y"})
>       assert decoded == ["x", "x", "y"]
E       AssertionError: assert ['x', 'y', 'y'] == ['x', 'x', 'y']
E        At index 1 diff: 'y' != 'x'
Tip
It's important to test for the variety of inputs and expected outputs that we outlined above and to never assume that a test is trivial. In our example above, it's important that we test for both "apple" and "Apple" in the event that our function didn't account for casing!
Classes
We can also test classes and their respective functions.
1 2 3 4 5 | |
There are also more xunit-style testing options available as well for more involved testing with classes.
Parametrize
So far, in our tests, we've had to create individual assert statements to validate different combinations of inputs and expected outputs. However, there's a bit of redundancy here because the inputs always feed into our functions as arguments and the outputs are compared with our expected outputs. To remove this redundancy, pytest has the @pytest.mark.parametrize decorator which allows us to represent our inputs and outputs as parameters.
1 2 3 4 5 6 7 8 9 10 | |
[Line 2]: define the names of the parameters under the decorator, ex. "fruit, crisp" (note that this is one string).[Lines 3-7]: provide a list of combinations of values for the parameters from Step 1.[Line 9]: pass in parameter names to the test function.[Line 10]: include necessary assert statements which will be executed for each of the combinations in the list from Step 2.
Similarly, we could pass in an exception as the expected result as well:
1 2 3 4 5 6 7 8 9 | |
Fixtures
Parametrization allows us to reduce redundancy inside test functions but what about reducing redundancy across different test functions? For example, suppose that different test functions all have a common component (ex. preprocessor). Here, we can use pytest's builtin fixture, which is a function that is executed before the test function. Let's rewrite our test_fit_transform function from above using a fixture:
1 2 3 4 | |
where dataset_loc and preprocessor are fixtures defined in our tests/code/conftest.py script:
1 2 3 4 5 6 7 8 9 10 11 | |
All of our test scripts know to look inside a conftest.py script in the same directory for any fixtures. Note that the name of the fixture and the input argument to our function have to be the same.
Fixture scopes
Fixtures can have different scopes depending on how we want to use them. For example our df fixture has the module scope because we don't want to keep recreating it after every test but, instead, we want to create it just once for all the tests in our module (tests/test_data.py).
function: fixture is destroyed after every test.[default]class: fixture is destroyed after the last test in the class.module: fixture is destroyed after the last test in the module (script).package: fixture is destroyed after the last test in the package.session: fixture is destroyed after the last test of the session.
Markers
We've been able to execute our tests at various levels of granularity (all tests, script, function, etc.) but we can create custom granularity by using markers. We've already used one type of marker (parametrize) but there are several other builtin markers as well. For example, the skipif marker allows us to skip execution of a test if a condition is met. For example, supposed we only wanted to test training our model if a GPU is available:
1 2 3 4 5 6 | |
We can also create our own custom markers with the exception of a few reserved marker names.
1 2 3 | |
We can execute them by using the -m flag which requires a (case-sensitive) marker expression like below:
pytest -m "training"      #  runs all tests marked with `training`
pytest -m "not training"  #  runs all tests besides those marked with `training`
Tip
The proper way to use markers is to explicitly list the ones we've created in our pyproject.toml file. Here we can specify that all markers must be defined in this file with the --strict-markers flag and then declare our markers (with some info about them) in our markers list:
1 2 3 | |
1 2 3 4 5 6 7 8 | |
pytest --markers and we'll receive an error when we're trying to use a new marker that's not defined here.
Coverage
As we're developing tests for our application's components, it's important to know how well we're covering our code base and to know if we've missed anything. We can use the Coverage library to track and visualize how much of our codebase our tests account for. With pytest, it's even easier to use this package thanks to the pytest-cov plugin.
python3 -m pytest tests/code --cov madewithml --cov-report html --disable-warnings
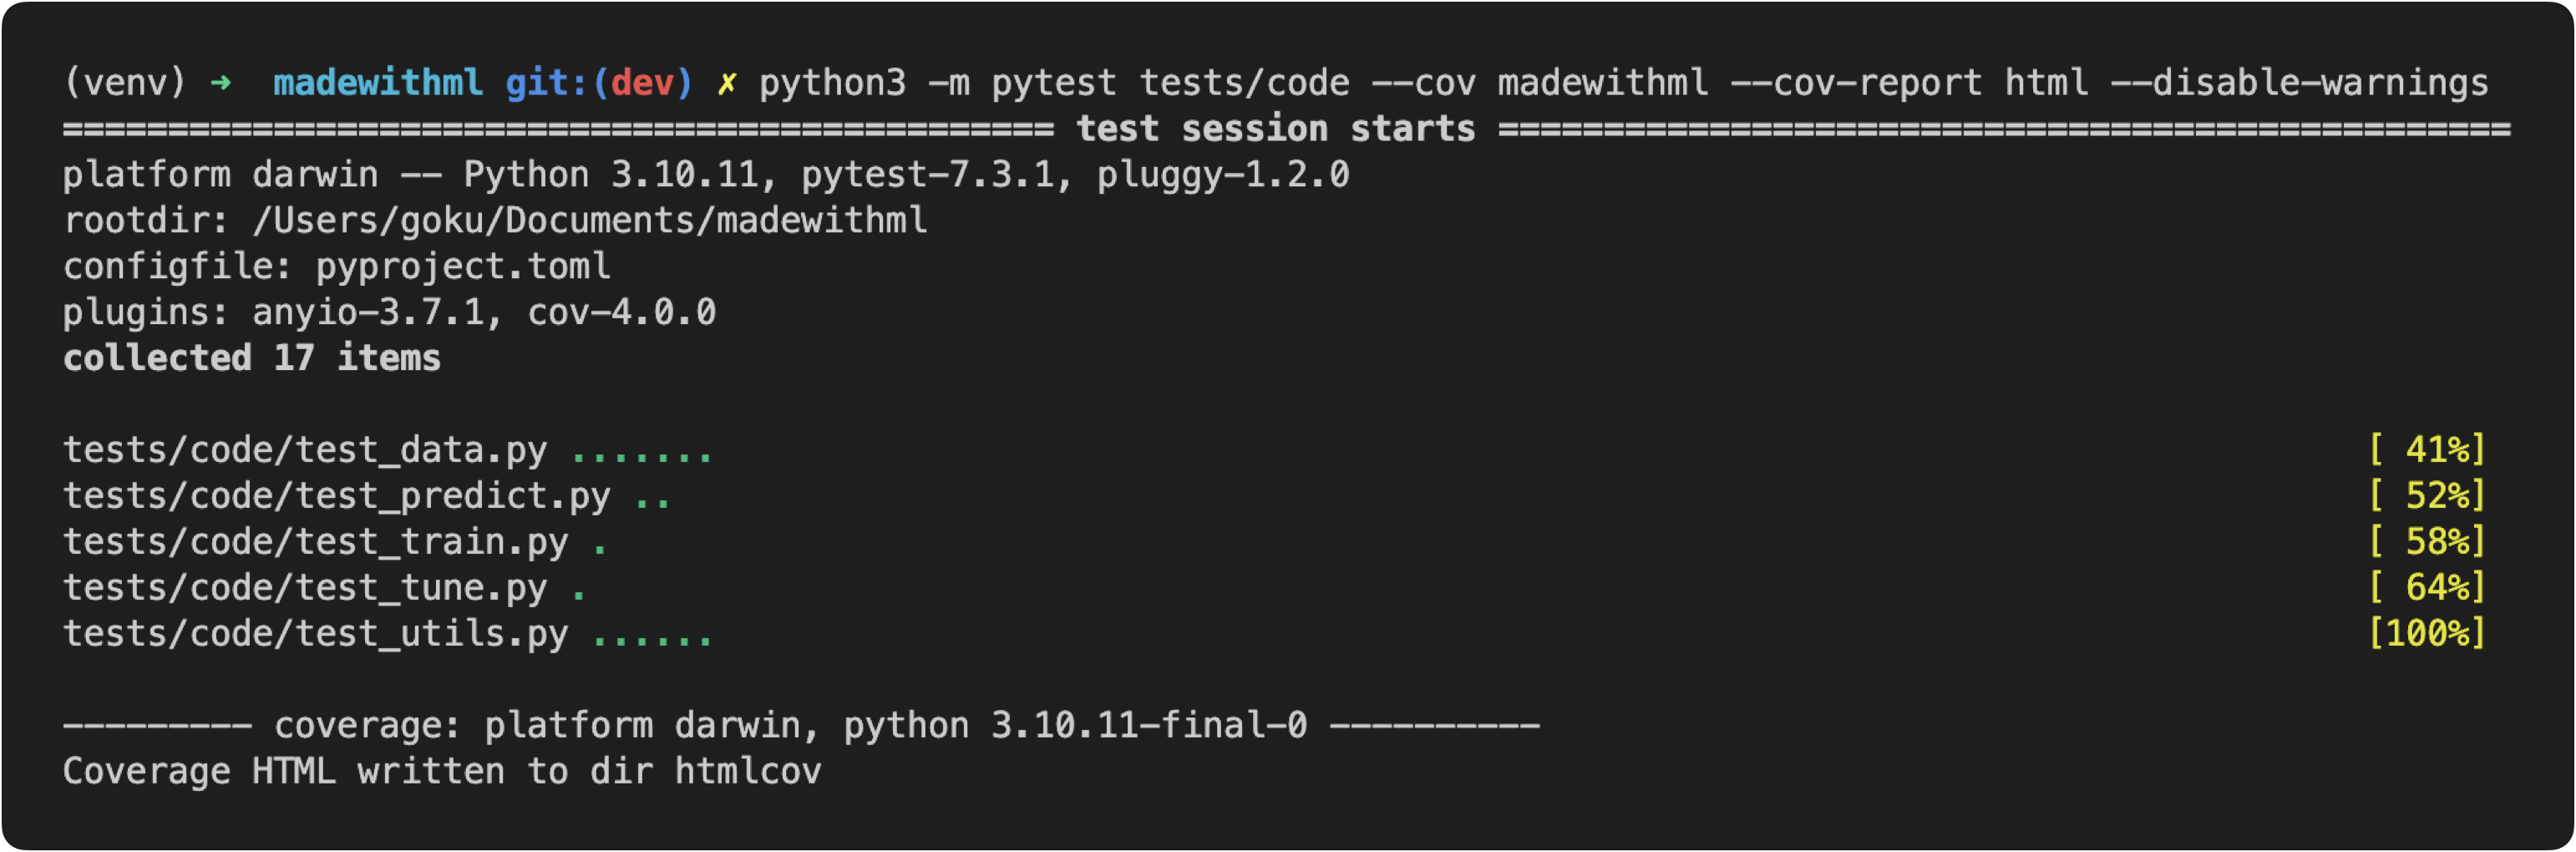
Here we're asking to run all tests under tests/code and to check for coverage for all the code in our madewithml directory. When we run this, we'll see the tests from our tests directory executing while the coverage plugin is keeping tracking of which lines in our application are being executed. Once our tests are done, we can view the generated report either through the terminal:
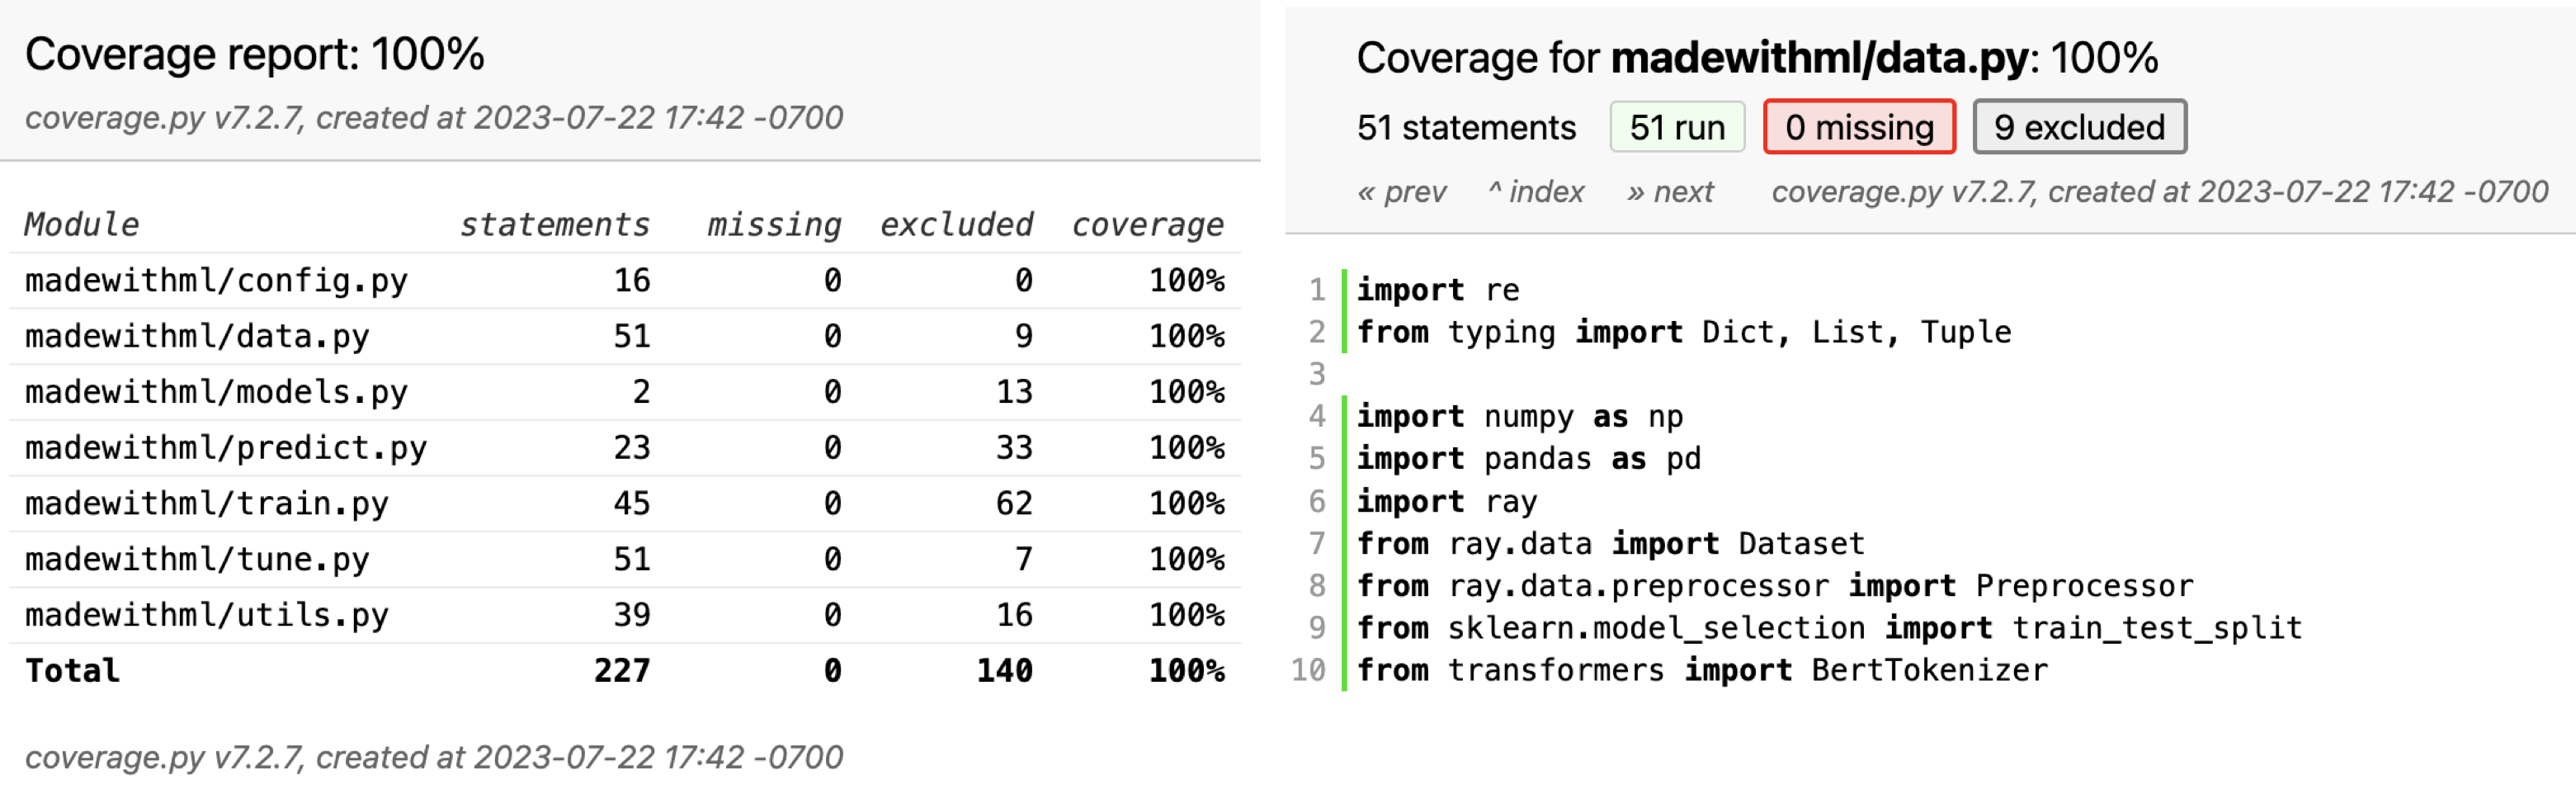
coverage report -m
Name                    Stmts   Miss  Cover   Missing
-----------------------------------------------------
madewithml/config.py       16      0   100%
madewithml/data.py         51      0   100%
madewithml/models.py        2      0   100%
madewithml/predict.py      23      0   100%
madewithml/train.py        45      0   100%
madewithml/tune.py         51      0   100%
madewithml/utils.py        39      0   100%
-----------------------------------------------------
TOTAL                     227      0   100%
but a more interactive way is to view it through the htmlcov/index.html on a browser. Here we can click on individual files to see which parts were not covered by any tests.
Warning
Though we have 100% coverage, this does not mean that our application is perfect. Coverage only indicates that a piece of code executed in a test, not necessarily that every part of it was tested, let alone thoroughly tested. Therefore, coverage should never be used as a representation of correctness. However, it is very useful to maintain coverage at 100% so we can know when new functionality has yet to be tested. In our CI/CD lesson, we'll see how to use GitHub actions to make 100% coverage a requirement when pushing to specific branches.
Exclusions
Sometimes it doesn't make sense to write tests to cover every single line in our application yet we still want to account for these lines so we can maintain 100% coverage. We have two levels of purview when applying exclusions:
-
Excusing lines by adding this comment
# pragma: no cover, <MESSAGE>1 2
if results_fp: # pragma: no cover, saving results utils.save_dict(d, results_fp) -
Excluding files by specifying them in our
pyproject.tomlconfiguration:
1 2 3 | |
The main point is that we were able to add justification to these exclusions through comments so our team can follow our reasoning.
Now that we have a foundation for testing traditional software, let's dive into testing our data and models in the context of machine learning systems.
🔢 Data
So far, we've used unit and integration tests to test the functions that interact with our data but we haven't tested the validity of the data itself. We're going to use the great expectations library to test what our data is expected to look like. It's a library that allows us to create expectations as to what our data should look like in a standardized way. It also provides modules to seamlessly connect with backend data sources such as local file systems, S3, databases, etc. Let's explore the library by implementing the expectations we'll need for our application.
👉 Follow along interactive notebook in the testing-ml repository as we implement the concepts below.
First we'll load the data we'd like to apply our expectations on. We can load our data from a variety of sources (filesystem, database, cloud etc.) which we can then wrap around a Dataset module (Pandas / Spark DataFrame, SQLAlchemy). Since multiple data tests may want access to this data, we'll create a fixture for it.
1 2 3 4 5 6 7 8 9 10 | |
Expectations
When it comes to creating expectations as to what our data should look like, we want to think about our entire dataset and all the features (columns) within it.
column_list = ["id", "created_on", "title", "description", "tag"]
df.expect_table_columns_to_match_ordered_list(column_list=column_list) # schema adherence
tags = ["computer-vision", "natural-language-processing", "mlops", "other"]
df.expect_column_values_to_be_in_set(column="tag", value_set=tags) # expected labels
df.expect_compound_columns_to_be_unique(column_list=["title", "description"]) # data leaks
df.expect_column_values_to_not_be_null(column="tag") # missing values
df.expect_column_values_to_be_unique(column="id") # unique values
df.expect_column_values_to_be_of_type(column="title", type_="str") # type adherence
Each of these expectations will create an output with details about success or failure, expected and observed values, expectations raised, etc. For example, the expectation df.expect_column_values_to_be_of_type(column="title", type_="str") would produce the following if successful:
1 2 3 4 5 6 7 8 9 10 11 12 13 14 15 16 17 18 19 20 21 22 23 24 25 26 27 | |
and if we have a failed expectation (ex. df.expect_column_values_to_be_of_type(column="title", type_="int")), we'd receive this output(notice the counts and examples for what caused the failure):
1 2 3 4 5 6 7 8 9 10 11 12 13 14 15 16 17 18 19 20 21 22 23 24 25 26 27 28 29 30 31 32 | |
There are just a few of the different expectations that we can create. Be sure to explore all the expectations, including custom expectations. Here are some other popular expectations that don't pertain to our specific dataset but are widely applicable:
- feature value relationships with other feature values →
expect_column_pair_values_a_to_be_greater_than_b - value statistics (mean, std, median, max, min, sum, etc.) →
expect_column_mean_to_be_between
Suite
Instead of running each of these individually, we can combine them all into an expectation suite.
1 2 3 4 5 6 7 8 9 10 11 12 13 14 15 16 | |
We can now execute these data tests just like a code test.
export DATASET_LOC="https://raw.githubusercontent.com/GokuMohandas/Made-With-ML/main/datasets/dataset.csv"
pytest --dataset-loc=$DATASET_LOC tests/data --verbose --disable-warnings
Note
We've added a --dataset-loc flag to pytest by specifying in our tests/data/conftest.py script. This allows us to pass in the dataset location as an argument to our tests.
1 2 3 | |
We're keeping things simple by using our expectations with pytest but Great expectations also has a lot more functionality around connecting to data sources, Checkpoints to execute suites across various parts of the pipeline, data docs to generate reports, etc.
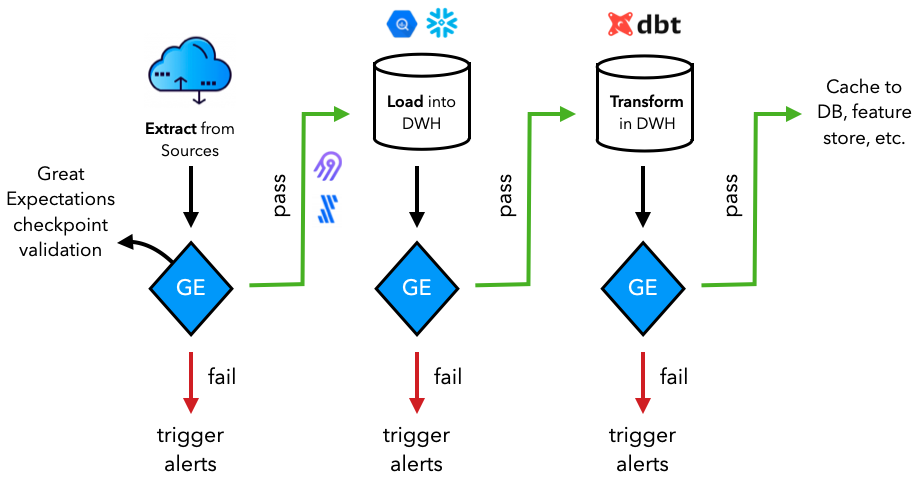
Production
While we're validating our datasets inside our machine learning applications, in most production scenarios, the data validation happens much further upstream. Our dataset may not be used just for our specific application and may actually be feeding into many other downstream application (ML and otherwise). Therefore, it's a great idea to execute these data validation tests as up stream as possible so that downstream applications can reliably use the data.
Learn more about different data systems in our data engineering lesson if you're not familiar with them.
🤖 Models
The final aspect of testing ML systems involves how to test machine learning models during training, evaluation, inference and deployment.
Training
We want to write tests iteratively while we're developing our training pipelines so we can catch errors quickly. This is especially important because, unlike traditional software, ML systems can run to completion without throwing any exceptions / errors but can produce incorrect systems. We also want to catch errors quickly to save on time and compute.
- Check shapes and values of model output
1assert model(inputs).shape == torch.Size([len(inputs), num_classes]) - Check for decreasing loss after one batch of training
1assert epoch_loss < prev_epoch_loss - Overfit on a batch
1
2
accuracy = train(model, inputs=batches[0]) assert accuracy == pytest.approx(0.95, abs=0.05) # 0.95 ± 0.05 - Train to completion (tests early stopping, saving, etc.)
1
2
3
train(model) assert learning_rate >= min_learning_rate assert artifacts - On different devices
1
2
assert train(model, device=torch.device("cpu"))
assert train(model, device=torch.device("cuda"))
Note
You can mark the compute intensive tests with a pytest marker and only execute them when there is a change being made to system affecting the model.
1 2 3 | |
Behavioral testing
Behavioral testing is the process of testing input data and expected outputs while treating the model as a black box (model agnostic evaluation). They don't necessarily have to be adversarial in nature but more along the types of perturbations we may expect to see in the real world once our model is deployed. A landmark paper on this topic is Beyond Accuracy: Behavioral Testing of NLP Models with CheckList which breaks down behavioral testing into three types of tests:
invariance: Changes should not affect outputs.1 2 3
# INVariance via verb injection (changes should not affect outputs) get_label(text="Transformers applied to NLP have revolutionized machine learning.", predictor=predictor) get_label(text="Transformers applied to NLP have disrupted machine learning.", predictor=predictor)
'natural-language-processing' 'natural-language-processing'
directional: Change should affect outputs.1 2 3 4
# DIRectional expectations (changes with known outputs) get_label(text="ML applied to text classification.", predictor=predictor) get_label(text="ML applied to image classification.", predictor=predictor) get_label(text="CNNs for text classification.", predictor=predictor)
'natural-language-processing' 'computer-vision' 'natural-language-processing'
minimum functionality: Simple combination of inputs and expected outputs.1 2 3 4
# Minimum Functionality Tests (simple input/output pairs) get_label(text="Natural language processing is the next big wave in machine learning.", predictor=predictor) get_label(text="MLOps is the next big wave in machine learning.", predictor=predictor) get_label(text="This is about graph neural networks.", predictor=predictor)
'natural-language-processing' 'mlops' 'other'
And we can convert these tests into proper parameterized tests by first defining from fixtures in our tests/model/conftest.py and our tests/model/utils.py scripts:
1 2 3 4 5 6 7 8 9 10 11 12 13 14 15 16 17 18 19 | |
1 2 3 4 5 6 7 8 9 10 11 | |
And now, we can use these components to create our behavioral tests:
1 2 3 4 5 6 7 8 9 10 11 12 13 14 15 16 | |
1 2 3 4 5 6 7 8 9 10 11 12 13 14 15 16 17 18 19 20 21 22 | |
1 2 3 4 5 6 7 8 9 10 11 12 13 14 15 16 17 18 19 20 21 22 | |
And we can execute them just like any other test:
# Model tests
export EXPERIMENT_NAME="llm"
export RUN_ID=$(python madewithml/predict.py get-best-run-id --experiment-name $EXPERIMENT_NAME --metric val_loss --mode ASC)
pytest --run-id=$RUN_ID tests/model --verbose --disable-warnings
Testing vs. monitoring
We'll conclude by talking about the similarities and distinctions between testing and monitoring. They're both integral parts of the ML development pipeline and depend on each other for iteration. Testing is assuring that our system (code, data and models) passes the expectations that we've established offline. Whereas, monitoring involves that these expectations continue to pass online on live production data while also ensuring that their data distributions are comparable to the reference window (typically subset of training data) through \(t_n\). When these conditions no longer hold true, we need to inspect more closely (retraining may not always fix our root problem).
With monitoring, there are quite a few distinct concerns that we didn't have to consider during testing since it involves (live) data we have yet to see.
- features and prediction distributions (drift), typing, schema mismatches, etc.
- determining model performance (rolling and window metrics on overall and slices of data) using indirect signals (since labels may not be readily available).
- in situations with large data, we need to know which data points to label and upsample for training.
- identifying anomalies and outliers.
We'll cover all of these concepts in much more depth (and code) in our monitoring lesson.
Resources
- The ML Test Score: A Rubric for ML Production Readiness and Technical Debt Reduction
- Beyond Accuracy: Behavioral Testing of NLP Models with CheckList
- Robustness Gym: Unifying the NLP Evaluation Landscape
Upcoming live cohorts
Sign up for our upcoming live cohort, where we'll provide live lessons + QA, compute (GPUs) and community to learn everything in one day.
To cite this content, please use:
1 2 3 4 5 6 | |