APIs for Model Serving
Repository

Subscribe to our newsletter
📬 Receive new lessons straight to your inbox (once a month) and join 40K+ developers in learning how to responsibly deliver value with ML.
Intuition
Our CLI application made it much easier to interact with our models, especially for fellow team members who may not want to delve into the codebase. But there are several limitations to serving our models with a CLI:
- users need access to the terminal, codebase, virtual environment, etc.
- CLI outputs on the terminal are not exportable
To address these issues, we're going to develop an application programming interface (API) that will anyone to interact with our application with a simple request.
The end user may not directly interact with our API but may use UI/UX components that send requests to our it.
Serving
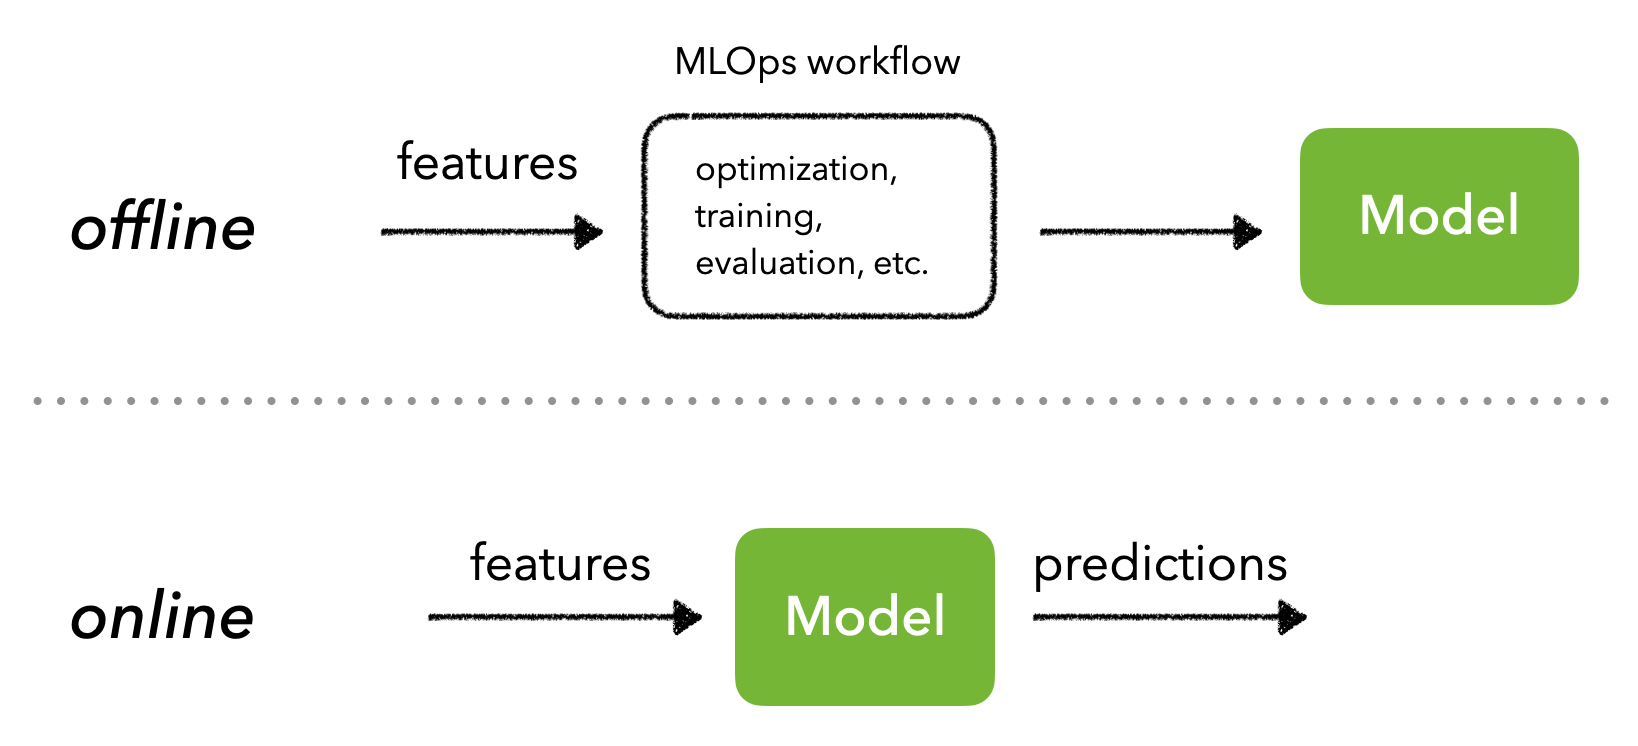
APIs allow different applications to communicate with each other in real-time. But when it comes to serving predictions, we need to first decide if we'll do that in batches or real-time, which is entirely based on the feature space (finite vs. unbound).
Batch serving
We can make batch predictions on a finite set of inputs which are then written to a database for low latency inference. When a user or downstream process sends an inference request in real-time, cached results from the database are returned.
- ✅ generate and cache predictions for very fast inference for users.
- ✅ the model doesn't need to be spun up as it's own service since it's never used in real-time.
- ❌ predictions can become stale if user develops new interests that aren’t captured by the old data that the current predictions are based on.
- ❌ input feature space must be finite because we need to generate all the predictions before they're needed for real-time.
Batch serving tasks
What are some tasks where batch serving is ideal?
Show answer
Recommend content that existing users will like based on their viewing history. However, new users may just receive some generic recommendations based on their explicit interests until we process their history the next day. And even if we're not doing batch serving, it might still be useful to cache very popular sets of input features (ex. combination of explicit interests leads to certain recommended content) so that we can serve those predictions faster.
Real-time serving
We can also serve live predictions, typically through a request to an API with the appropriate input data.

- ✅ can yield more up-to-date predictions which may yield a more meaningful user experience, etc.
- ❌ requires managed microservices to handle request traffic.
- ❌ requires real-time monitoring since input space in unbounded, which could yield erroneous predictions.
In this lesson, we'll create the API required to enable real-time serving. The interactions in our situation involve the client (users, other applications, etc.) sending a request (ex. prediction request) with the appropriate inputs to the server (our application with a trained model) and receiving a response (ex. prediction) in return.
Request
Users will interact with our API in the form of a request. Let's take a look at the different components of a request:
URI
A uniform resource identifier (URI) is an identifier for a specific resource.
https://localhost:8000/models/{modelId}/?filter=passed#details
| Parts of the URI | Description |
|---|---|
| scheme | protocol definition |
| domain | address of the website |
| port | endpoint |
| path | location of the resource |
| query string | parameters to identify resources |
| anchor | location on webpage |
| Parts of the path | Description |
|---|---|
/models |
collection resource of all models |
/models/{modelID} |
single resource from the models collection |
modelId |
path parameters |
filter |
query parameter |
Method
The method is the operation to execute on the specific resource defined by the URI. There are many possible methods to choose from, but the four below are the most popular, which are often referred to as CRUD because they allow you to Create, Read, Update and Delete.
GET: get a resource.POST: create or update a resource.PUT/PATCH: create or update a resource.DELETE: delete a resource.
Note
You could use either the POST or PUT request method to create and modify resources but the main difference is that PUT is idempotent which means you can call the method repeatedly and it'll produce the same state every time. Whereas, calling POST multiple times can result in creating multiple instance and so changes the overall state each time.
POST /models/<new_model> -d {}       # error since we haven't created the `new_model` resource yet
POST /models -d {}                   # creates a new model based on information provided in data
POST /models/<existing_model> -d {}  # updates an existing model based on information provided in data

PUT /models/<new_model> -d {}        # creates a new model based on information provided in data
PUT /models/<existing_model> -d {}   # updates an existing model based on information provided in data
We can use cURL to execute our API calls with the following options:
curl --help
Usage: curl [options...]-X, --request HTTP method (ie. GET) -H, --header headers to be sent to the request (ex. authentication) -d, --data data to POST, PUT/PATCH, DELETE (usually JSON) ...
For example, if we want to GET all models, our cURL command would look like this:
curl -X GET "http://localhost:8000/models"
Headers
Headers contain information about a certain event and are usually found in both the client's request as well as the server's response. It can range from what type of format they'll send and receive, authentication and caching info, etc.
curl -X GET "http://localhost:8000/" \          # method and URI
    -H  "accept: application/json"  \           # client accepts JSON
    -H  "Content-Type: application/json" \      # client sends JSON
Body
The body contains information that may be necessary for the request to be processed. It's usually a JSON object sent during POST, PUT/PATCH, DELETE request methods.
curl -X POST "http://localhost:8000/models" \   # method and URI
    -H  "accept: application/json" \            # client accepts JSON
    -H  "Content-Type: application/json" \      # client sends JSON
    -d "{'name': 'RoBERTa', ...}"               # request body
Response
The response we receive from our server is the result of the request we sent. The response also includes headers and a body which should include the proper HTTP status code as well as explicit messages, data, etc.
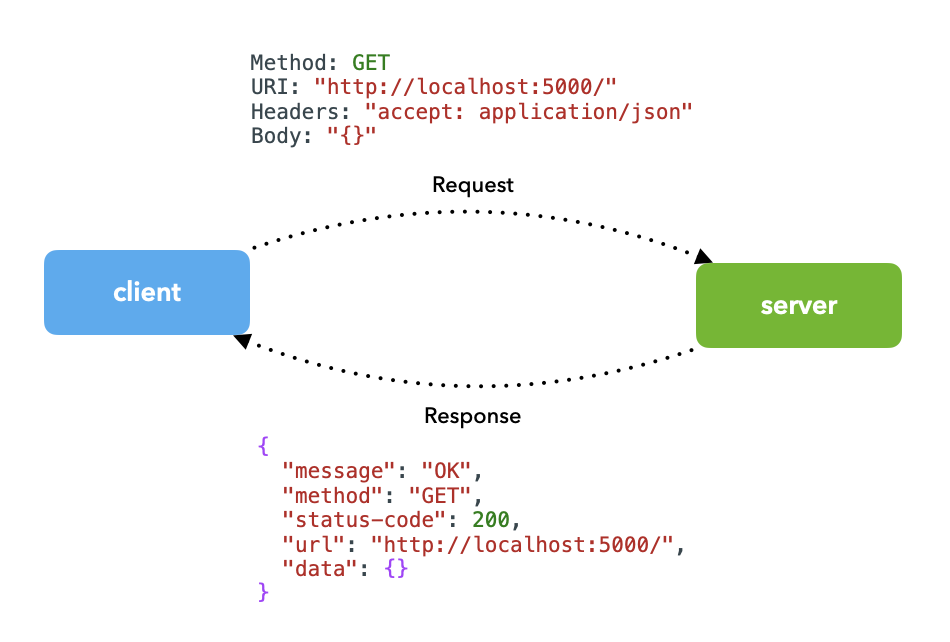
{
  "message": "OK",
  "method": "GET",
  "status-code": 200,
  "url": "http://localhost:8000/",
  "data": {}
}
We may also want to include other metadata in the response such as model version, datasets used, etc. Anything that the downstream consumer may be interested in or metadata that might be useful for inspection.
There are many HTTP status codes to choose from depending on the situation but here are the most common options:
| Code | Description |
|---|---|
200 OK |
method operation was successful. |
201 CREATED |
POST or PUT method successfully created a resource. |
202 ACCEPTED |
the request was accepted for processing (but processing may not be done). |
400 BAD REQUEST |
server cannot process the request because of a client side error. |
401 UNAUTHORIZED |
you're missing required authentication. |
403 FORBIDDEN |
you're not allowed to do this operation. |
404 NOT FOUND |
the resource you're looking for was not found. |
500 INTERNAL SERVER ERROR |
there was a failure somewhere in the system process. |
501 NOT IMPLEMENTED |
this operation on the resource doesn't exist yet. |
Best practices
When designing our API, there are some best practices to follow:
- URI paths, messages, etc. should be as explicit as possible. Avoid using cryptic resource names, etc.
- Use nouns, instead of verbs, for naming resources. The request method already accounts for the verb (✅
GET /usersnot ❌GET /get_users). - Plural nouns (✅
GET /users/{userId}not ❌GET /user/{userID}). - Use dashes in URIs for resources and path parameters but use underscores for query parameters (
GET /nlp-models/?find_desc=bert). - Return appropriate HTTP and informative messages to the user.
Implementation
We're going to define our API in a separate app directory because, in the future, we may have additional packages like tagifai and we don't want our app to be attached to any one package. Inside our app directory, we'll create the follow scripts:
mkdir app
cd app
touch api.py gunicorn.py schemas.py
cd ../
app/
├── api.py          - FastAPI app
├── gunicorn.py     - WSGI script
└── schemas.py      - API model schemas
api.py: the main script that will include our API initialization and endpoints.gunicorn.py: script for defining API worker configurations.schemas.py: definitions for the different objects we'll use in our resource endpoints.
FastAPI
We're going to use FastAPI as our framework to build our API service. There are plenty of other framework options out there such as Flask, Django and even non-Python based options like Node, Angular, etc. FastAPI combines many of the advantages across these frameworks and is maturing quickly and becoming more widely adopted. It's notable advantages include:
- development in Python
- highly performant
- data validation via pydantic
- autogenerated documentation
- dependency injection
- security via OAuth2
pip install fastapi==0.78.0
# Add to requirements.txt
fastapi==0.78.0
Your choice of framework also depends on your team's existing systems and processes. However, with the wide adoption of microservices, we can wrap our specific application in any framework we choose and expose the appropriate resources so all other systems can easily communicate with it.
Initialization
The first step is to initialize our API in our api.py script` by defining metadata like the title, description and version:
1 2 3 4 5 6 7 8 9 | |
Our first endpoint is going to be a simple one where we want to show that everything is working as intended. The path for the endpoint will just be / (when a user visit our base URI) and it'll be a GET request. This simple endpoint is often used as a health check to ensure that our application is indeed up and running properly.
1 2 3 4 5 6 7 8 9 10 11 12 13 | |
We let our application know that the endpoint is at / through the path operation decorator in line 4 and we return a JSON response with the 200 OK HTTP status code.
In our actual
api.pyscript, you'll notice that even our index function looks different. Don't worry, we're slowly adding components to our endpoints and justifying them along the way.
Launching
We're using Uvicorn, a fast ASGI server that can run asynchronous code in a single process to launch our application.
pip install uvicorn==0.17.6
# Add to requirements.txt
uvicorn==0.17.6
We can launch our application with the following command:
uvicorn app.api:app \       # location of app (`app` directory > `api.py` script > `app` object)
    --host 0.0.0.0 \        # localhost
    --port 8000 \           # port 8000
    --reload \              # reload every time we update
    --reload-dir tagifai \  # only reload on updates to `tagifai` directory
    --reload-dir app        # and the `app` directory
INFO:     Will watch for changes in these directories: ['/Users/goku/Documents/madewithml/mlops/app', '/Users/goku/Documents/madewithml/mlops/tagifai']
INFO:     Uvicorn running on http://0.0.0.0:8000 (Press CTRL+C to quit)
INFO:     Started reloader process [57609] using statreload
INFO:     Started server process [57611]
INFO:     Waiting for application startup.
INFO:     Application startup complete.
Notice that we only reload on changes to specific directories, as this is to avoid reloading on files that won't impact our application such as log files, etc.
If we want to manage multiple uvicorn workers to enable parallelism in our application, we can use Gunicorn in conjunction with Uvicorn. This will usually be done in a production environment where we'll be dealing with meaningful traffic. We've included a app/gunicorn.py script with the customizable configuration and we can launch all the workers with the follow command:
gunicorn -c config/gunicorn.py -k uvicorn.workers.UvicornWorker app.api:app
We'll add both of these commands to our README.md file as well:
uvicorn app.api:app --host 0.0.0.0 --port 8000 --reload --reload-dir tagifai --reload-dir app  # dev
gunicorn -c app/gunicorn.py -k uvicorn.workers.UvicornWorker app.api:app  # prod
Requests
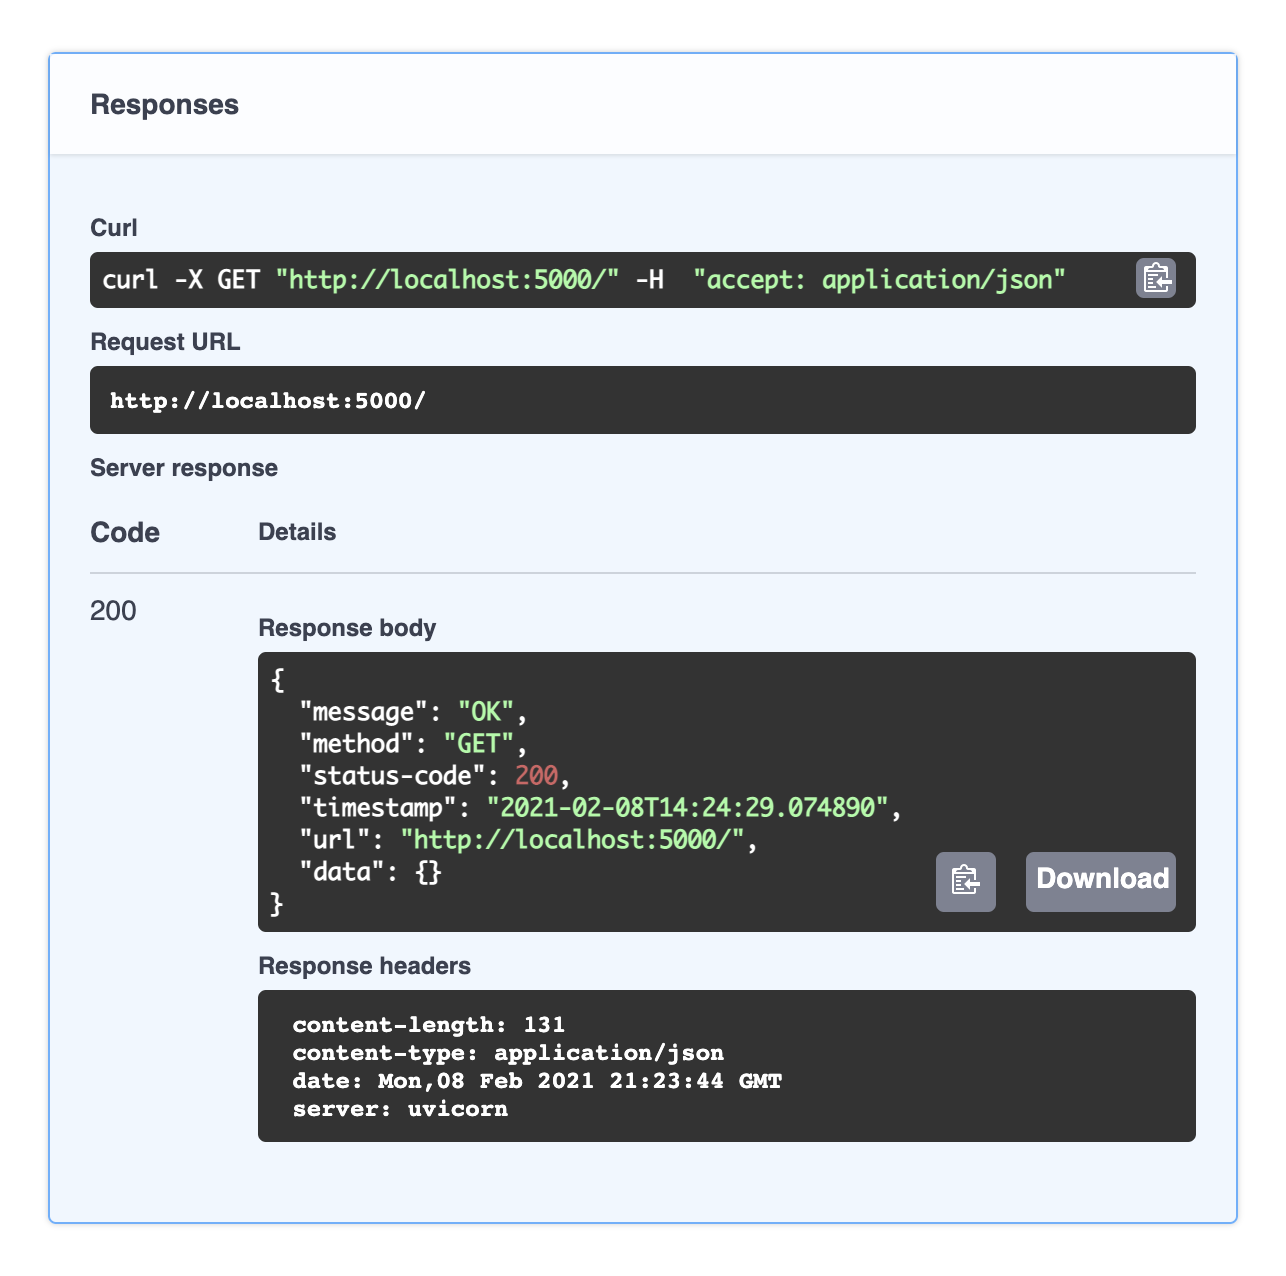
Now that we have our application running, we can submit our GET request using several different methods:
- Visit the endpoint on a browser at http://localhost:8000/
- cURL
curl -X GET http://localhost:8000/ - Access endpoints via code. Here we show how to do it with the requests library in Python but it can be done with most popular languages. You can even use an online tool to convert your cURL commands into code!
1
2
3
4
5
import json import requests response = requests.get("http://localhost:8000/") print (json.loads(response.text)) - Using external tools like Postman, which is great for managed tests that you can save and share with other, etc.
For all of these, we'll see the exact same response from our API:
{
  "message": "OK",
  "status-code": 200,
  "data": {}
}
Decorators
In our GET \ request's response above, there was not a whole lot of information about the actual request, but it's useful to have details such as URL, timestamp, etc. But we don't want to do this individually for each endpoint, so let's use decorators to automatically add relevant metadata to our responses
1 2 3 4 5 6 7 8 9 10 11 12 13 14 15 16 17 18 19 20 21 22 23 | |
We're passing in a Request instance in line 10 so we can access information like the request method and URL. Therefore, our endpoint functions also need to have this Request object as an input argument. Once we receive the results from our endpoint function f, we can append the extra details and return a more informative response. To use this decorator, we just have to wrap our functions accordingly.
1 2 3 4 5 6 7 8 9 10 | |
{
    message: "OK",
    method: "GET",
    status-code: 200,
    timestamp: "2021-02-08T13:19:11.343801",
    url: "http://localhost:8000/",
    data: { }
}
There are also some built-in decorators we should be aware of. We've already seen the path operation decorator (ex. @app.get("/")) which defines the path for the endpoint as well as other attributes. There is also the events decorator (@app.on_event()) which we can use to startup and shutdown our application. For example, we use the (@app.on_event("startup")) event to load the artifacts for the model to use for inference. The advantage of doing this as an event is that our service won't start until this is complete and so no requests will be prematurely processed and cause errors. Similarly, we can perform shutdown events with (@app.on_event("shutdown")), such as saving logs, cleaning, etc.
1 2 3 4 5 6 7 8 9 10 | |
Documentation
When we define an endpoint, FastAPI automatically generates some documentation (adhering to OpenAPI standards) based on the it's inputs, typing, outputs, etc. We can access the Swagger UI for our documentation by going to /docs endpoints on any browser while the api is running.
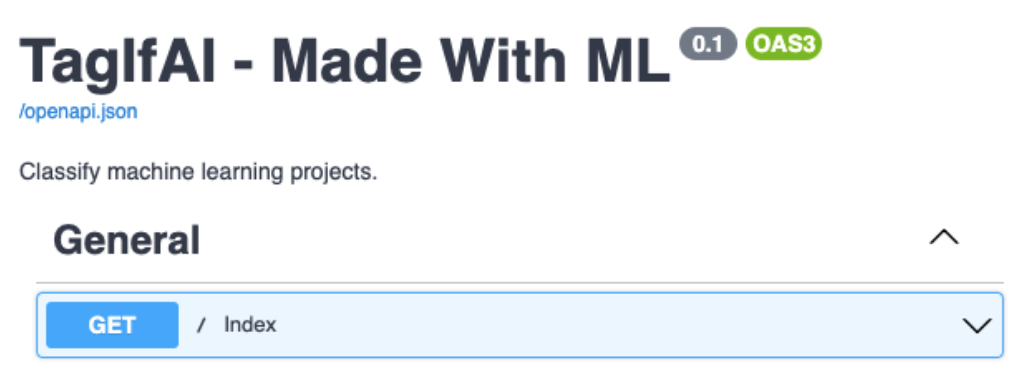
Click on an endpoint > Try it out > Execute to see what the server's response will look like. Since this was a GET request without any inputs, our request body was empty but for other method's we'll need to provide some information (we'll illustrate this when we do a POST request).
Notice that our endpoint is organized under sections in the UI. We can use tags when defining our endpoints in the script:
1 2 3 4 5 6 7 8 9 10 | |
You can also use
/redocendpoint to view the ReDoc documentation or Postman to execute and manage tests that you can save and share with others.
Resources
When designing the resources for our API , we need to think about the following questions:
-
[USERS]: Who are the end users? This will define what resources need to be exposed.- developers who want to interact with the API.
- product team who wants to test and inspect the model and it's performance.
- backend service that wants to classify incoming projects.
-
[ACTIONS]: What actions do our users want to be able to perform?- prediction for a given set of inputs
- inspection of performance
- inspection of training arguments
Query parameters
1 2 3 4 5 6 7 8 9 10 11 12 | |
Notice that we're passing an optional query parameter filter here to indicate the subset of performance we care about. We can include this parameter in our GET request like so:
curl -X "GET" \
  "http://localhost:8000/performance?filter=overall" \
  -H "accept: application/json"
And this will only produce the subset of the performance we indicated through the query parameter:
{
  "message": "OK",
  "method": "GET",
  "status-code": 200,
  "timestamp": "2021-03-21T13:12:01.297630",
  "url": "http://localhost:8000/performance?filter=overall",
  "data": {
    "performance": {
      "precision": 0.8941372402587212,
      "recall": 0.8333333333333334,
      "f1": 0.8491658224308651,
      "num_samples": 144
    }
  }
}
Path parameters
Our next endpoint will be to GET the arguments used to train the model. This time, we're using a path parameter args, which is a required field in the URI.
1 2 3 4 5 6 7 8 9 10 11 12 | |
We can perform our GET request like so, where the param is part of the request URI's path as opposed to being part of it's query string.
curl -X "GET" \
  "http://localhost:8000/args/learning_rate" \
  -H "accept: application/json"
And we'd receive a response like this:
{
  "message": "OK",
  "method": "GET",
  "status-code": 200,
  "timestamp": "2021-03-21T13:13:46.696429",
  "url": "http://localhost:8000/params/hidden_dim",
  "data": {
    "learning_rate": 0.14688087680118794
  }
}
We can also create an endpoint to produce all the arguments that were used:
View GET /args
1 2 3 4 5 6 7 8 9 10 11 12 | |
We can perform our GET request like so, where the param is part of the request URI's path as opposed to being part of it's query string.
curl -X "GET" \
"http://localhost:8000/args" \
-H "accept: application/json"
And we'd receive a response like this:
{
"message":"OK",
"method":"GET",
"status-code":200,
"timestamp":"2022-05-25T11:56:37.344762",
"url":"http://localhost:8001/args",
"data":{
    "args":{
    "shuffle":true,
    "subset":null,
    "min_freq":75,
    "lower":true,
    "stem":false,
    "analyzer":"char_wb",
    "ngram_max_range":8,
    "alpha":0.0001,
    "learning_rate":0.14688087680118794,
    "power_t":0.158985493618746
    }
  }
}
Schemas
Now it's time to define our endpoint for prediction. We need to consume the inputs that we want to classify and so we need to define the schema that needs to be followed when defining those inputs.
# app/schemas.py
from typing import List
from fastapi import Query
from pydantic import BaseModel

class Text(BaseModel):
    text: str = Query(None, min_length=1)

class PredictPayload(BaseModel):
    texts: List[Text]
Here we're defining a PredictPayload object as a List of Text objects called texts. Each Text object is a string that defaults to None and must have a minimum length of 1 character.
Note
We could've just defined our PredictPayload like so:
1 2 | |
We can now use this payload in our predict endpoint:
1 2 3 4 5 6 7 8 9 10 11 12 13 14 15 | |
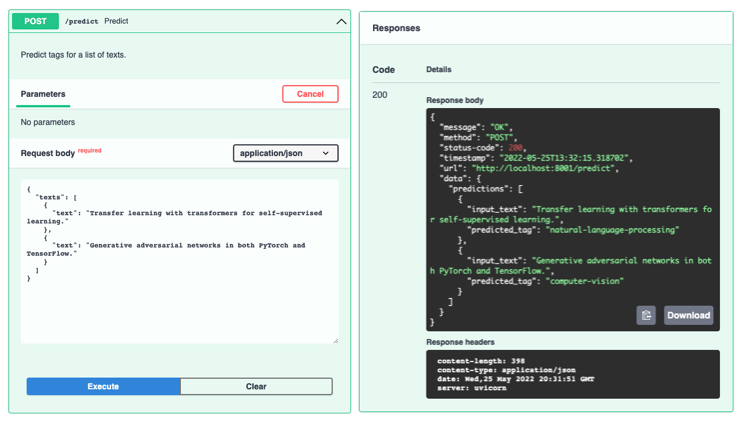
We need to adhere to the PredictPayload schema when we want to user our /predict endpoint:
curl -X 'POST' 'http://0.0.0.0:8000/predict' \
    -H 'accept: application/json' \
    -H 'Content-Type: application/json' \
    -d '{
    "texts": [
        {"text": "Transfer learning with transformers for text classification."},
        {"text": "Generative adversarial networks for image generation."}
      ]
    }'
{
  "message":"OK",
  "method":"POST",
  "status-code":200,
  "timestamp":"2022-05-25T12:23:34.381614",
  "url":"http://0.0.0.0:8001/predict",
  "data":{
    "predictions":[
      {
        "input_text":"Transfer learning with transformers for text classification.",
        "predicted_tag":"natural-language-processing"
      },
      {
        "input_text":"Generative adversarial networks for image generation.",
        "predicted_tag":"computer-vision"
      }
    ]
  }
}
Validation
Built-in
We're using pydantic's BaseModel object here because it offers built-in validation for all of our schemas. In our case, if a Text instance is less than 1 character, then our service will return the appropriate error message and code:
curl -X POST "http://localhost:8000/predict" -H "accept: application/json" -H "Content-Type: application/json" -d "{\"texts\":[{\"text\":\"\"}]}"
{
  "detail": [
    {
      "loc": [
        "body",
        "texts",
        0,
        "text"
      ],
      "msg": "ensure this value has at least 1 characters",
      "type": "value_error.any_str.min_length",
      "ctx": {
        "limit_value": 1
      }
    }
  ]
}
Custom
We can also add custom validation on a specific entity by using the @validator decorator, like we do to ensure that list of texts is not empty.
1 2 3 4 5 6 7 8 | |
curl -X POST "http://localhost:8000/predict" -H "accept: application/json" -H "Content-Type: application/json" -d "{\"texts\":[]}"
{
  "detail":[
    {
      "loc":[
        "body",
        "texts"
      ],
      "msg": "List of texts to classify cannot be empty.",
      "type": "value_error"
    }
  ]
}
Extras
Lastly, we can add a schema_extra object under a Config class to depict what an example PredictPayload should look like. When we do this, it automatically appears in our endpoint's documentation (click Try it out).
1 2 3 4 5 6 7 8 9 10 11 12 13 14 15 16 17 18 | |
Product
To make our API a standalone product, we'll need to create and manage a database for our users and resources. These users will have credentials which they will use for authentication and use their privileges to be able to communicate with our service. And of course, we can display a rendered frontend to make all of this seamless with HTML forms, buttons, etc. This is exactly how the old MWML platform was built and we leveraged FastAPI to deliver high performance for 500K+ daily service requests.
If you are building a product, then I highly recommending forking this generation template to get started. It includes the backbone architecture you need for your product:
- Databases (models, migrations, etc.)
- Authentication via JWT
- Asynchronous task queue with Celery
- Customizable frontend via Vue JS
- Docker integration
- so much more!
However, for the majority of ML developers, thanks to the wide adoption of microservices, we don't need to do all of this. A well designed API service that can seamlessly communicate with all other services (framework agnostic) will fit into any process and add value to the overall product. Our main focus should be to ensure that our service is working as it should and constantly improve, which is exactly what the next cluster of lessons will focus on (testing and monitoring)
Model server
Besides wrapping our models as separate, scalable microservices, we can also have a purpose-built model server to host our models. Model servers provide a registry with an API layer to seamlessly inspect, update, serve, rollback, etc. multiple versions of models. They also offer automatic scaling to meet throughput and latency needs. Popular options include BentoML, MLFlow, TorchServe, RedisAI, Nvidia Triton Inference Server, etc.
Model servers are experiencing a lot of adoption for their ability to standardize the model deployment and serving processes across the team -- enabling seamless upgrades, validation and integration.
Upcoming live cohorts
Sign up for our upcoming live cohort, where we'll provide live lessons + QA, compute (GPUs) and community to learn everything in one day.
To cite this content, please use:
1 2 3 4 5 6 | |