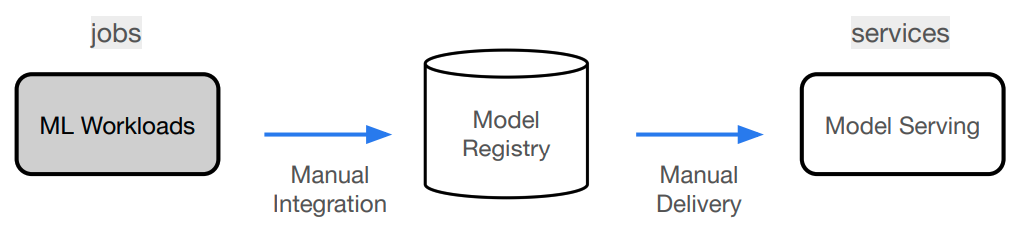
Jobs and Services

Subscribe to our newsletter
📬 Receive new lessons straight to your inbox (once a month) and join 40K+ developers in learning how to responsibly deliver value with ML.
Intuition
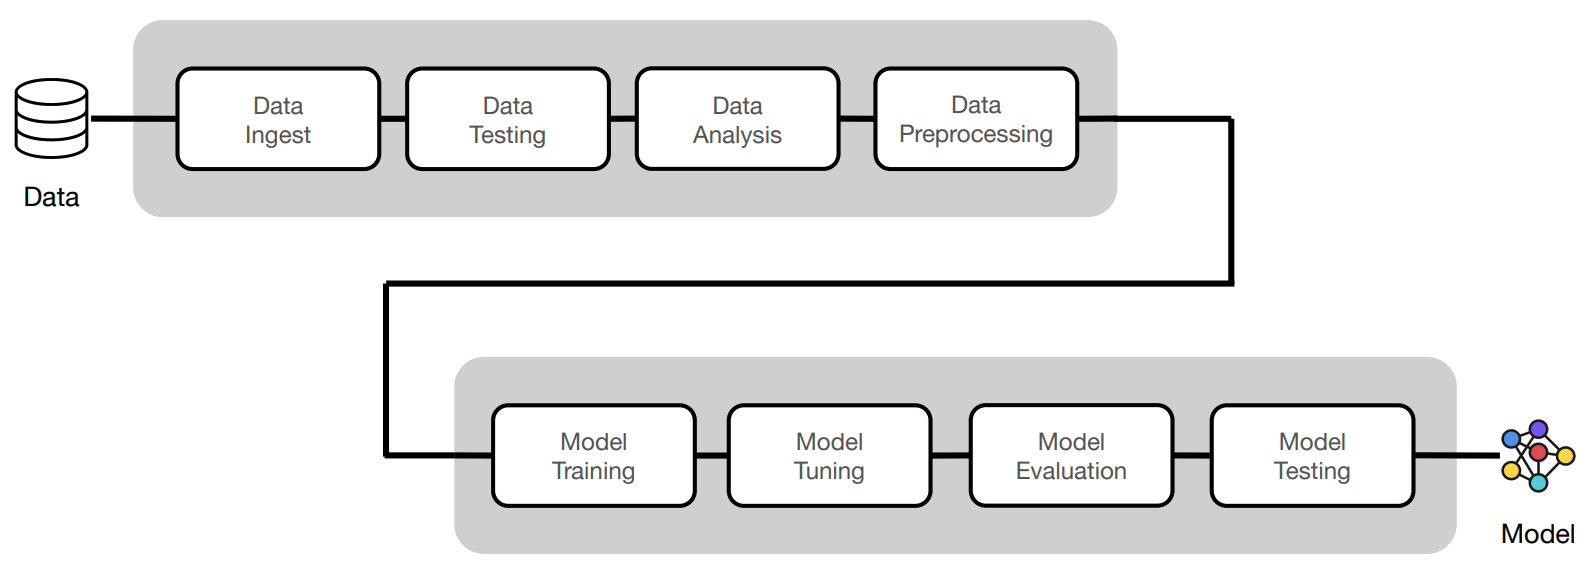
Our ML workloads have been responsible for everything from data ingestion to model validation:
We can execute these workloads as standalone CLI commands:
1 2 3 4 5 6 7 | |
With all of our ML workloads implemented (and tested), we're ready to go to production. In this lesson, we'll learn how to convert our ML workloads from CLI commands into a scalable, fault-tolerant and reproducible workflow.
- We'll combine our ML workloads up to (and including) model validation into a workflow.
- This workflow will then produce model artifacts, which will be saved to our model registry.
- And finally, we can serve that model behind an API endpoint to use in production.
Jobs
Script
Since we have our CLI commands for our ML workloads, we could just execute them one-by-one on our local machine or Workspace. But for efficiency, we're going to combine them all into one script. We'll organize this under a workloads.sh bash script inside our deploy/jobs directory. Here the workloads are very similar to our CLI commands but we have some additional steps to print and save the logs from each of our workloads. For example, our data validation workload looks like this:
# deploy/jobs/workloads.sh
export RESULTS_FILE=results/test_data_results.txt
export DATASET_LOC="https://raw.githubusercontent.com/GokuMohandas/Made-With-ML/main/datasets/dataset.csv"
pytest --dataset-loc=$DATASET_LOC tests/data --verbose --disable-warnings > $RESULTS_FILE
cat $RESULTS_FILE
At the end of our workloads.sh script, we save our model registry (with our saved model artifacts) and the results from the different workloads to S3. We'll use these artifacts and results later on when we deploy our model as a Service.
# Save to S3
export MODEL_REGISTRY=$(python -c "from madewithml import config; print(config.MODEL_REGISTRY)")
aws s3 cp $MODEL_REGISTRY s3://madewithml/$GITHUB_USERNAME/mlflow/ --recursive
aws s3 cp results/ s3://madewithml/$GITHUB_USERNAME/results/ --recursive
Note
If you're doing this lesson on your local laptop, you'll have to add the proper AWS credentials and up the S3 buckets for our workloads script to run successfully.
export AWS_ACCESS_KEY_ID=""
export AWS_SECRET_ACCESS_KEY=""
export AWS_SESSION_TOKEN=""
Configuration
Now that we have our single script to execute all workloads, we can execute it with one command (./deploy/jobs/workloads.sh). But even better way is to use Anyscale Jobs to get features like automatic failure handling, email alerts and persisted logs all out of the box for our workloads. And with our cluster_env.yaml, cluster_compute.yaml and workloads.sh files, we can create the configuration for our Anyscale Job with an workloads.yaml file:
1 2 3 4 5 6 7 8 9 10 11 12 | |
Line 2: name of our Anyscale JobLine 3: name of our Anyscale Project (we're organizing it all under the samemadewithmlproject we used for our Workspace setup)Line 4: name of our cluster environmentLine 5: name of our compute configurationLine 6-10: runtime environment for our Anyscale Job. Theruntime_envhere specifies that we should upload our currentworking_dirto an S3 bucket so that all of our workers when we execute an Anyscale Job have access to the code to use. We also set some environment variables that our workloads will have access to.Line 11: entrypoint for our Anyscale Job. This is the command that will be executed when we submit our Anyscale Job.Line 12: maximum number of retries for our Anyscale Job. If our Anyscale Job fails, it will automatically retry up to this number of times.
Warning
Be sure to update the $GITHUB_USERNAME slots inside our deploy/jobs/workloads.yaml configuration to your own GitHub username. This is used to save your model registry and results to a unique path on our shared S3 bucket (s3://madewithml).
Because we're using the exact same cluster environment and compute configuration, what worked during development will work in production. This is a huge benefit of using Anyscale Jobs because we don't have to worry about any environment discrepanices when we deploy our workloads to production. This makes going to production much easier and faster!
Execution
And now we can execute our Anyscale Job in one line:
anyscale job submit deploy/jobs/workloads.yaml
Authenticating

Output
(anyscale +8.8s) Maximum uptime is disabled for clusters launched by this job.
(anyscale +8.8s) Job prodjob_zqj3k99va8a5jtd895u3ygraup has been successfully submitted. Current state of job: PENDING.
(anyscale +8.8s) Query the status of the job with `anyscale job list --job-id prodjob_zqj3k99va8a5jtd895u3ygraup`.
(anyscale +8.8s) Get the logs for the job with `anyscale job logs --job-id prodjob_zqj3k99va8a5jtd895u3ygraup --follow`.
(anyscale +8.8s) View the job in the UI at https://console.anyscale.com/jobs/prodjob_zqj3k99va8a5jtd895u3ygraup
(anyscale +8.8s) Use --follow to stream the output of the job when submitting a job.
Tip
When we run anyscale cli commands inside our Workspaces, we automatically have our credentials set up for us. But if we're running anyscale cli commands on our local laptop, we'll have to set up the appropriate credentials.
export ANYSCALE_HOST=https://console.anyscale.com ANYSCALE_CLI_TOKEN=your_cli_token
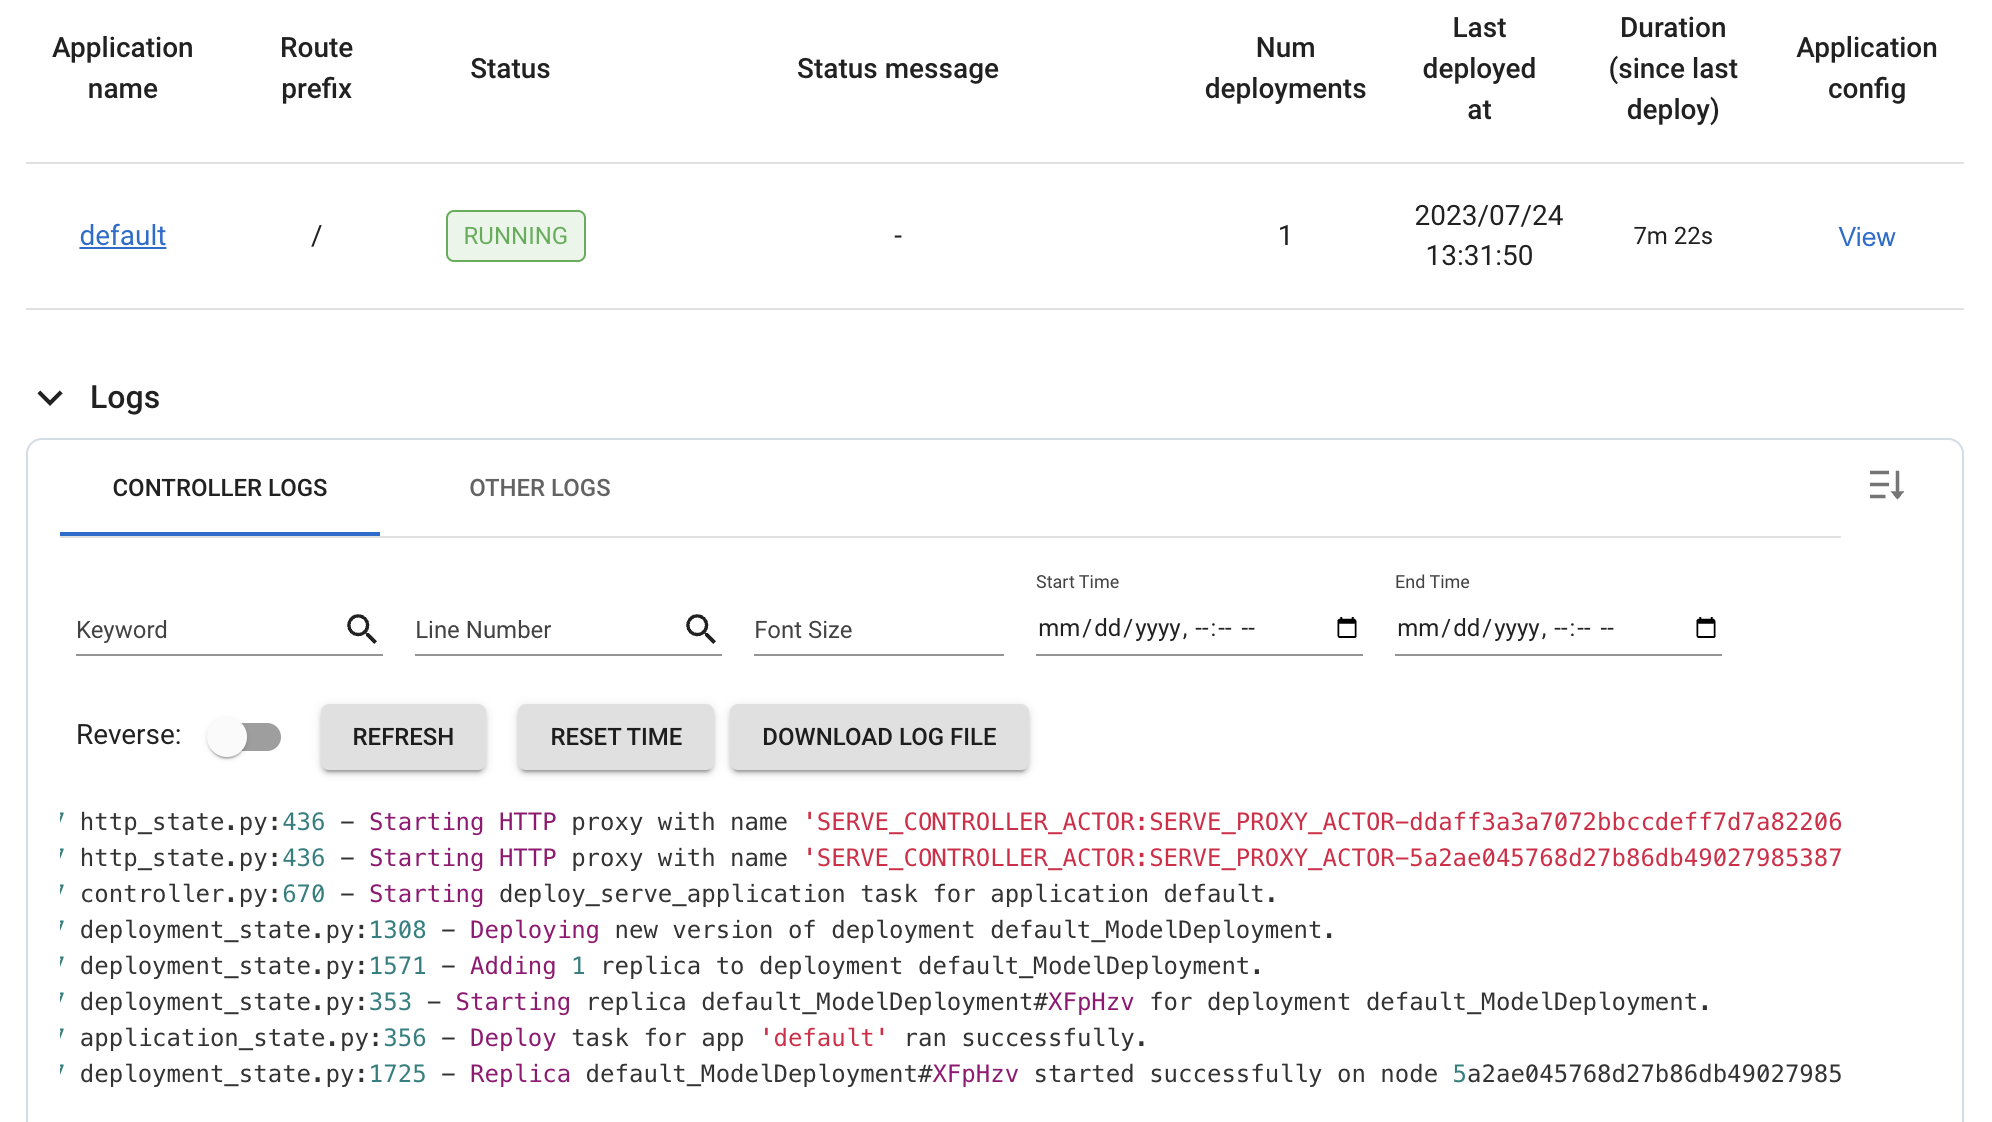
We can now go to thie UI link that was provided to us to view the status, logs, etc. of our Anyscale Job.

And if we inspect our S3 buckets, we'll can see all the artifacts that have been saved from this Anyscale Job.
Debugging
Since we use the exact same cluster (environment and compute) for production as we did for development, we're significantly less likely to run into the environment discrepancy issues that typically arise when going from development to production. However, there can always be small issues that arize from missing credentials, etc. We can easily debug our Anyscale Jobs by inspecting the jobs: Jobs page > choose job > View console logs at the bottom > View Ray workers logs > paste command > Open job-logs directory > View job-driver-raysubmit_XYZ.log. Alternatively, we can also run our Anyscale Job as a Workspace by clicking on the Duplicate as Workspace button the top of a particular Job's page.
Services
After we execute our Anyscale Job, we will have saved our model artifacts to a particular location. We'll now use Anyscale Services to pull from this location to serve our models in production behind a scalable rest endpoint
Script
Similar to Anyscale Jobs, we'll start by creating a serve_model.py and a serve_model.yaml configuration:
1 2 3 4 5 6 7 8 9 10 11 12 13 14 15 16 17 18 19 20 21 22 23 24 25 26 | |
In this script, we first pull our previously saved artifacts from our S3 bucket to our local storage and then define the entrypoint for our model.
Tip
Recall that we have the option to scale when we define our service inside out madewithml/serve.py script. And we can scale our compute configuration to meet those demands.
1 2 3 4 5 | |
Configuration
We can now use this entrypoint that we defined to serve our application:
1 2 3 4 5 6 7 8 9 10 11 12 13 | |
Line 2: name of our Anyscale ServiceLine 3: name of our Anyscale Project (we're organizing it all under the samemadewithmlproject we used for our Workspace setup)Line 4: name of our cluster environmentLine 5: name of our compute configurationLine 6-12: serving configuration that specifies our entry point and details about the working directory, environment variables, etc.Line 13: rollout strategy for our Anyscale Service. We can either rollout a new version of our service or replace the existing version with the new one.
Warning
Be sure to update the $GITHUB_USERNAME slots inside our deploy/services/serve_model.yaml configuration to your own GitHub username. This is used to pull model artifacts and results from our shared S3 bucket (s3://madewithml).
Execution
And now we can execute our Anyscale Service in one line:
# Rollout service
anyscale service rollout -f deploy/services/serve_model.yaml
Authenticating

Output
(anyscale +7.3s) Service service2_xwmyv1wcm3i7qan2sahsmybymw has been deployed. Service is transitioning towards: RUNNING.
(anyscale +7.3s) View the service in the UI at https://console.anyscale.com/services/service2_xwmyv1wcm3i7qan2sahsmybymw
Note
If we chose the ROLLOUT strategy, we get a canary rollout (increasingly serving traffic to the new version of our service) by default.
Once our service is up and running, we can query it:
# Query
curl -X POST -H "Content-Type: application/json" -H "Authorization: Bearer $SECRET_TOKEN" -d '{
  "title": "Transfer learning with transformers",
  "description": "Using transformers for transfer learning on text classification tasks."
}' $SERVICE_ENDPOINT/predict/
{
   "results": [
      {
         "prediction": "natural-language-processing",
         "probabilities": {
            "computer-vision": 3.175719175487757E-4,
            "mlops": 4.065348766744137E-4,
            "natural-language-processing": 0.9989110231399536,
            "other": 3.6489960621111095E-4
         }
      }
   ]
}
And we can just as easily rollback to a previous version of our service or terminate it altogether:
# Rollback (to previous version of the Service)
anyscale service rollback -f $SERVICE_CONFIG --name $SERVICE_NAME

# Terminate
anyscale service terminate --name $SERVICE_NAME
Observability
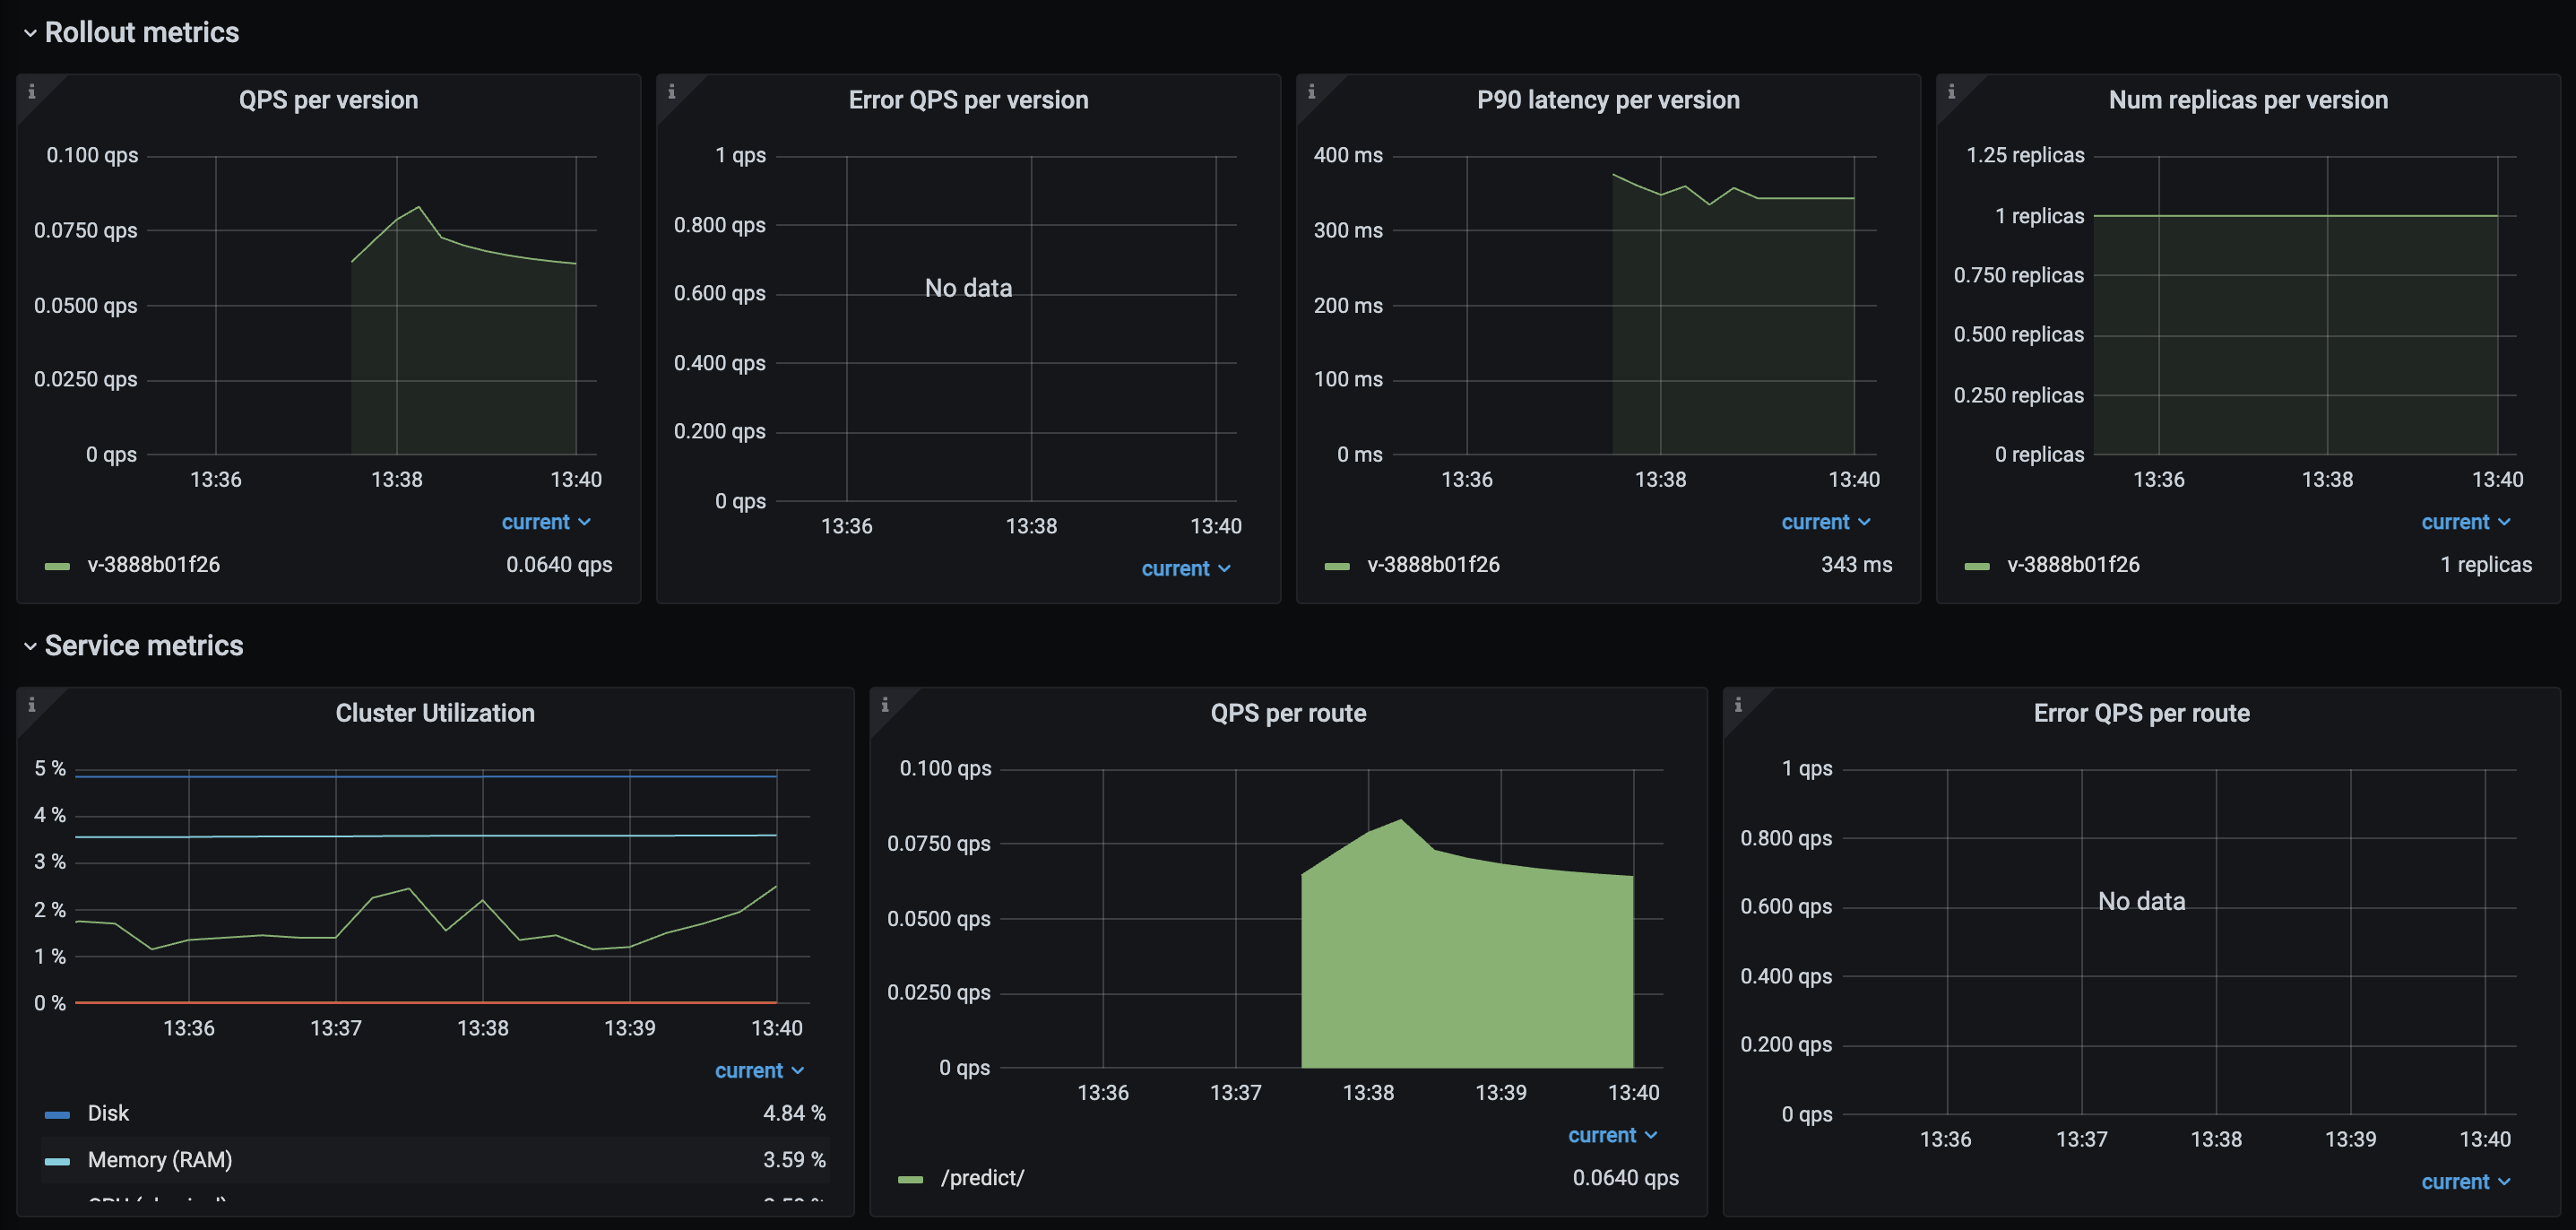
Once we rollout our service, we have several different dashboards that we can use to monitor our service. We can access these dashboards by going to the Services page > choose service > Click the Dashboard button (top right corner) > Ray Dashboard. Here we'll able to see the logs from our Service, metrics, etc.
On the same Dashboard button, we also have a Metrics option that will take us to a Grafana Dashboard. This view has a lot more metrics on incoming requests, latency, errors, etc.
Debugging
Serving our models may not always work as intended. Even if our model serving logic is correct, there are external dependencies that could causes errors --- such as our model not being stored where it should be, trouble accessing our model registry, etc. For all these cases and more, it's very important to know how to be able to debug our Services.
Services page > choose service > Go to Resource usage section > Click on the cluster link (cluster_for_service_XYZ) > Ray logs (tab at bottom) > paste command > Open worker-XYZ directory > View combined_worker.log
Scaling
The combination of using Workspaces for development and Job & Services for production make it extremely easy and fast to make the transition. The cluster environment and compute configurations are the exact same so the code that's executing runs on the same conditions. However, we may sometimes want to scale up our production compute configurations to execute Jobs faster or meet the availability/latency demands for our Services. We could address this by creating a new compute configuration:
# Compute config
export CLUSTER_COMPUTE_NAME="madewithml-cluster-compute-prod"
anyscale cluster-compute create deploy/cluster_compute_prod.yaml --name $CLUSTER_COMPUTE_NAME  # uses new config with prod compute requirements
or by using a one-off configuration to specify the compute changes, where instead of pointing to a previously existing compute configuration, we can define it directly in our Jobs/Services yaml configuration:
1 2 3 4 5 6 7 8 9 10 11 12 13 14 15 16 17 18 19 20 21 | |
And with that, we're able to completely productionize our ML workloads! We have a working service that we can use to make predictions using our trained model. However, what happens when we receive new data or our model's performance regresses over time? With our current approach here, we have to manually execute our Jobs and Services again to udpate our application. In the next lesson, we'll learn how to automate this process with CI/CD workflows that execute our Jobs and Services based on an event (e.g. new data).
Upcoming live cohorts
Sign up for our upcoming live cohort, where we'll provide live lessons + QA, compute (GPUs) and community to learn everything in one day.
To cite this content, please use:
1 2 3 4 5 6 | |