CI/CD for Machine Learning

Subscribe to our newsletter
📬 Receive new lessons straight to your inbox (once a month) and join 40K+ developers in learning how to responsibly deliver value with ML.
Intuition
In the previous lesson, we learned how to manually execute our ML workloads with Jobs and Services. However, we want to be able to automatically execute these workloads when certain events occur (new data, performance regressions, elapsed time, etc.) to ensure that our models are always up to date and increasing in quality. In this lesson, we'll learn how to create continuous integration and delivery (CI/CD) pipelines to achieve an application that is capable of continual learning.
GitHub Actions
We're going to use GitHub Actions to create our CI/CD pipelines. GitHub Actions allow us to define workflows that are triggered by events (pull request, push, etc.) and execute a series of actions.
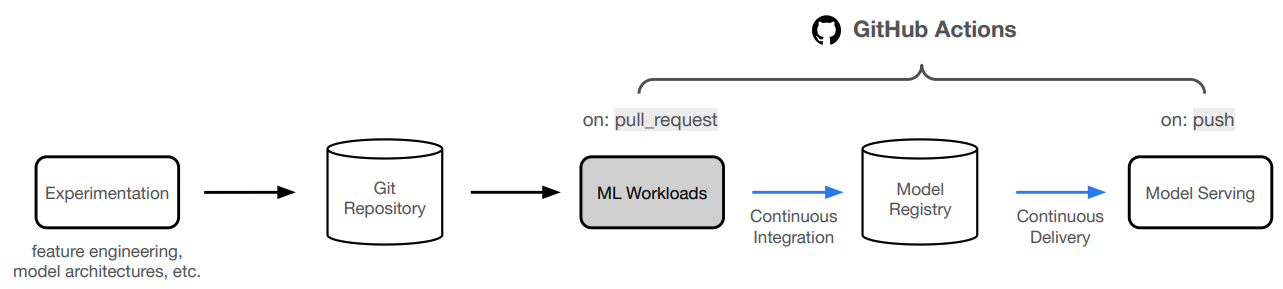
Our GitHub Actions are defined under our repository's .github/workflows directory where we have workflows for documentation (documentation.yaml), workloads (workloads.yaml) to train/validate a model and a final workflow for serving our model (serve.yaml). Let's start by understanding the structure of a workflow.
Events
Workflows are triggered by an event, which can be something that occurs on an event (like a push or pull request), schedule (cron), manually and many more. In our application, our workloads workflow is triggered on a pull request to the main branch and then our serve workflow and documentation workflows are triggered on a push to the main branch.
1 2 3 4 5 6 7 8 | |
This creates for the following ideal workflow:
- We make changes to our code and submit a pull request to the
mainbranch. - Our
workloadsworkflow is triggered and executes our model development workloads. - If the performance of the new model is better, we can merge the pull request and push the changes to the
mainbranch. - Our
serveworkflow is triggered and deploys our application to production (along with an update to ourdocumentation).
Jobs
Once the event is triggered, a set of jobs run on a runner (GitHub's infrastructure or self-hosted).
1 2 3 4 5 6 | |
Tip
Each of our workflows only have one job but if we had multiple, the jobs would all run in parallel. If we wanted to create dependent jobs, where if a particular job fails all it's dependent jobs will be skipped, then we'd use the needs keyword.
Steps
Each job contains a series of steps which are executed in order. Each step has a name, as well as actions to use from the GitHub Action marketplace and/or commands we want to run. For example, here's a look at one of the steps in our workloads job inside our workloads.yaml workflow:
1 2 3 4 5 6 7 8 9 10 11 12 13 | |
Workflows
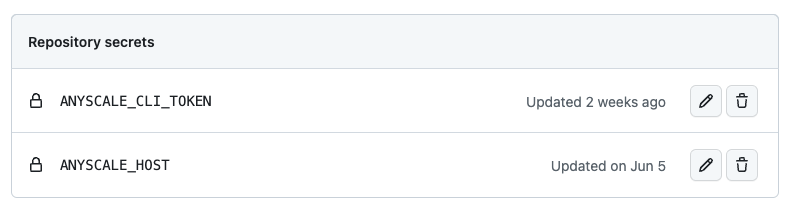
Now that we understand the basic components of a GitHub Actions workflow, let's take a closer look at each of our workflows. Most of our workflows will require access to our Anyscale credentials so we'll start by setting those up. We can set these secrets for our repository under the Settings tab.
And our first workflow will be our workloads workflow which will be triggered on a pull request to the main branch. This means that we'll need to push our local code changes to Git and then submit a pull request to the main branch. But in order to push our code to GitHub, we'll need to first authenticate with our credentials before pushing to our repository:
git config --global user.name $GITHUB_USERNAME
git config --global user.email [email protected]  # <-- CHANGE THIS to your email
git add .
git commit -m ""  # <-- CHANGE THIS to your message
git push origin dev
Now you will be prompted to enter your username and password (personal access token). Follow these steps to get personal access token: New GitHub personal access token → Add a name → Toggle repo and workflow → Click Generate token (scroll down) → Copy the token and paste it when prompted for your password.
Note that we should be on a
devbranch, which we set up in our setup lesson. If you're not, go ahead and rungit checkout -b devfirst.
And when any of our GitHub Actions workflows execute, we will be able to view them under the Actions tab of our repository. Here we'll find all the workflows that have been executed and we can inspect each one to see the details of the execution.
Workloads
Our workloads workflow is triggered on a pull request to the main branch. It contains a single job that runs our model development workloads with an Anyscale Job. The steps in this job are as follows:
- We start by configuring our AWS credentials so that we can push/pull from our S3 buckets. Recall that we store our model registry and results in S3 buckets so we need to be able to access them. We created an IAM role for this course so that only certain repositories can access our S3 buckets.
1
2
3
4
5
6
7
# Configure AWS credentials - name: Configure AWS credentials uses: aws-actions/configure-aws-credentials@v2 with: role-to-assume: arn:aws:iam::593241322649:role/github-actions-madewithml role-session-name: s3access aws-region: us-west-2 - Next, we checkout our repository code and install our Python dependencies so that we can execute our Anyscale Job.
1
2
3
4
5
6
7
# Set up dependencies - uses: actions/checkout@v3 - uses: actions/setup-python@v4 with: python-version: '3.10.11' cache: 'pip' - run: python3 -m pip install anyscale==0.5.128 typer==0.9.0 - Next, we can run our Anyscale Job but note that since this will be running on a GitHub hosted runner, we need to export our Anyscale credentials first (which we already set up earlier on our repository).
1
2
3
4
5
6
# Run workloads - name: Workloads run: | export ANYSCALE_HOST=$\{\{ secrets.ANYSCALE_HOST \}\} export ANYSCALE_CLI_TOKEN=$\{\{ secrets.ANYSCALE_CLI_TOKEN \}\} anyscale jobs submit deploy/jobs/workloads.yaml --wait - Recall that our Anyscale Job in the previous step saves our model registry and results to S3 buckets. So in this step, we'll read the artifacts from S3 (from our unique path using our GitHub username) and save them locally on our GitHub runner. We have a small utility script called
.github/workflows/json_to_md.pyto convert our JSON results to markdown tables that we can comment on our PR.1 2 3 4 5 6 7
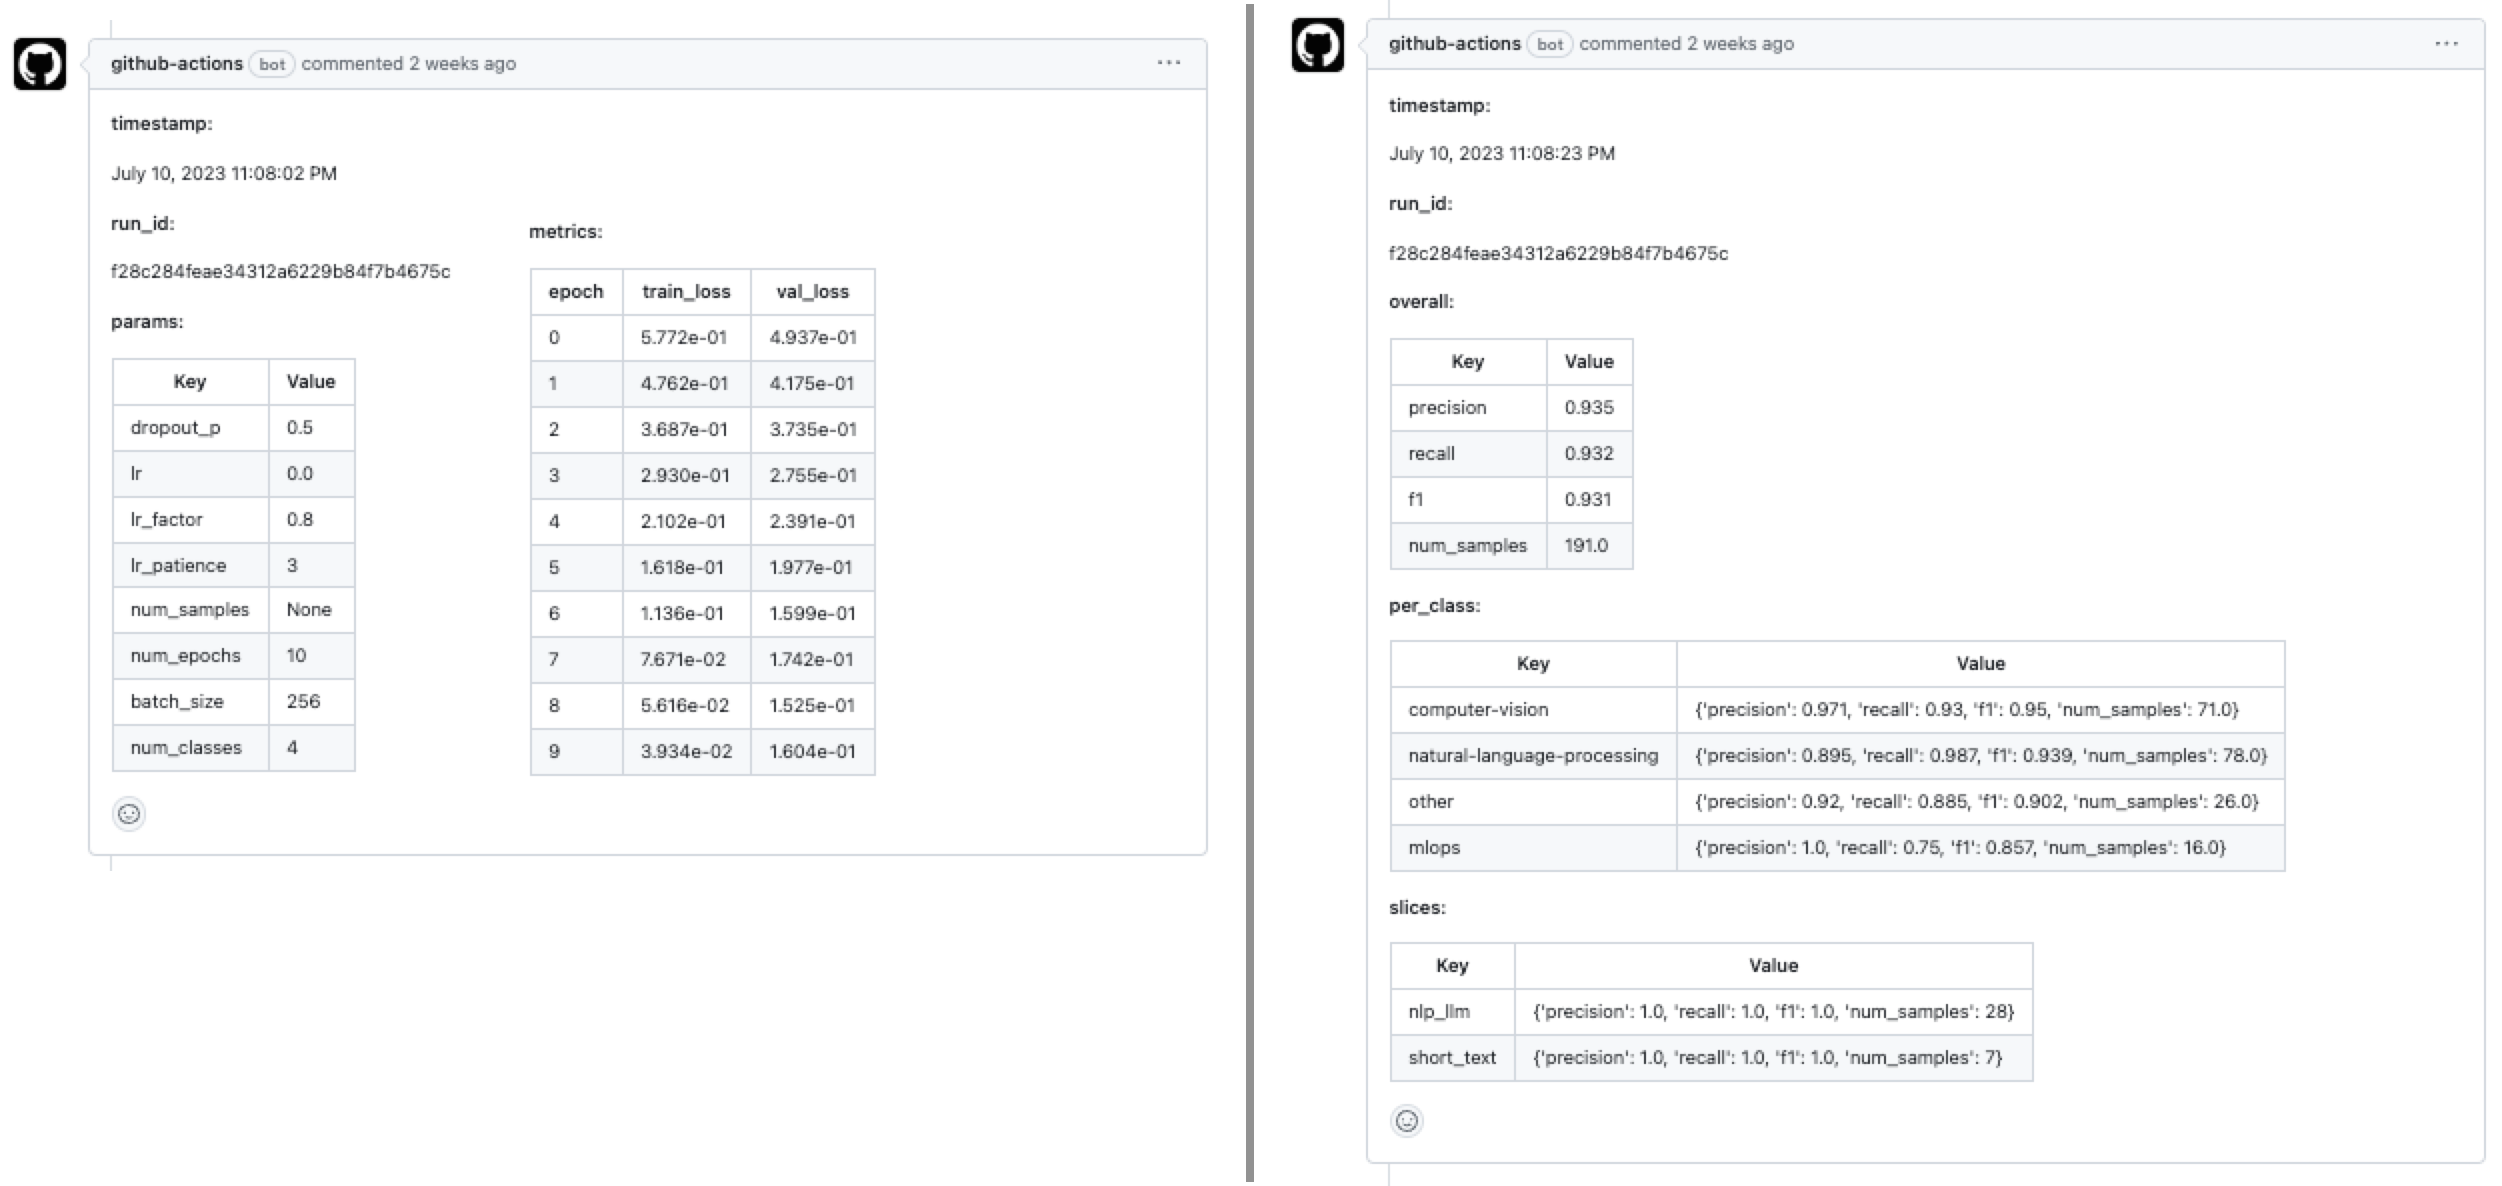
# Read results from S3 - name: Read results from S3 run: | mkdir results aws s3 cp s3://madewithml/$\{\{ github.actor \}\}/results/ results/ --recursive python .github/workflows/json_to_md.py results/training_results.json results/training_results.md python .github/workflows/json_to_md.py results/evaluation_results.json results/evaluation_results.md - We use a GitHub Action from the marketplace to comment our results markdown tables on our PR.
1 2 3 4 5 6 7 8 9
# Comment results to PR
- name: Comment training results on PR
uses: thollander/actions-comment-pull-request@v2
with:
    filePath: results/training_results.md
- name: Comment evaluation results on PR
uses: thollander/actions-comment-pull-request@v2
with:
    filePath: results/evaluation_results.md
So when this workloads workflow completes, we'll have a comment on our PR (example) with our training and evaluation results. We can now collaboratively analyze the details and decide if we want to merge the PR.
Tip
We could easily extend this by retrieving evaluation results from our currently deployed model in production as well. Recall that we defined a /evaluate/ endpoint for our service that expects a dataset location and returns the evaluation results. And we can submit this request as a step in our workflow and save the results to a markdown table that we can comment on our PR.
curl -X POST -H "Content-Type: application/json" -H "Authorization: Bearer $SECRET_TOKEN" -d '{
  "dataset": "https://raw.githubusercontent.com/GokuMohandas/Made-With-ML/main/datasets/holdout.csv"
}' $SERVICE_ENDPOINT/evaluate/
{
    "results": {
        "timestamp": "July 24, 2023 11:43:37 PM",
        "run_id": "f1684a944d314bacabeaa90ff972775b",
        "overall": {
            "precision": 0.9536309870079502,
            "recall": 0.9528795811518325,
            "f1": 0.9525489716579315,
            "num_samples": 191
        },
    }
}
Serve
If we like the results and we want to merge the PR and push to the main branch, our serve workflow will be triggered.
1 2 3 4 5 6 7 8 | |
It contains a single job that serves our model with Anyscale Services. The steps in this job are as follows:
- We start by configuring our AWS credentials so that we can push/pull from our S3 buckets. Recall that we store our model registry and results in S3 buckets so we need to be able to access them.
1
2
3
4
5
6
7
# Configure AWS credentials - name: Configure AWS credentials uses: aws-actions/configure-aws-credentials@v2 with: role-to-assume: arn:aws:iam::593241322649:role/github-actions-madewithml role-session-name: s3access aws-region: us-west-2 - Next, we checkout our repository code and install our Python dependencies so that we can execute our Anyscale Job.
1
2
3
4
5
6
7
# Set up dependencies - uses: actions/checkout@v3 - uses: actions/setup-python@v4 with: python-version: '3.10.11' cache: 'pip' - run: python3 -m pip install anyscale==0.5.128 typer==0.9.0 - Next, we can run our Anyscale Service but note that since this will be running on a GitHub hosted runner, we need to export our Anyscale credentials first (which we already set up earlier on our repository).
1
2
3
4
5
6
# Run workloads
- name: Workloads
run: |
    export ANYSCALE_HOST=$\{\{ secrets.ANYSCALE_HOST \}\}
    export ANYSCALE_CLI_TOKEN=$\{\{ secrets.ANYSCALE_CLI_TOKEN \}\}
    anyscale service rollout --service-config-file deploy/services/serve_model.yaml
So when this serve workflow completes, our model will be deployed to production and we can start making inference requests with it.
Note
The anyscale service rollout command will update our existing service (if there was already one running) without changing the SECRET_TOKEN or SERVICE_ENDPOINT. So this means that our downstream applications that were making inference requests to our service can continue to do so without any changes.
Documentation
Our documentation workflow is also triggered on a push to the main branch. It contains a single job that builds our docs. The steps in this job are as follows:
- We checkout our repository code and install our Python dependencies so that we can build our documentation.
1
2
3
4
5
6
7
# Set up dependencies - uses: actions/checkout@v3 - uses: actions/setup-python@v4 with: python-version: '3.10.11' cache: 'pip' - run: python3 -m pip install mkdocs==1.4.2 mkdocstrings==0.21.2 "mkdocstrings[python]>=0.18" - And finally, we deploy our documentation.
1
2
3
# Deploy docs
- name: Deploy documentation
run: mkdocs gh-deploy --force
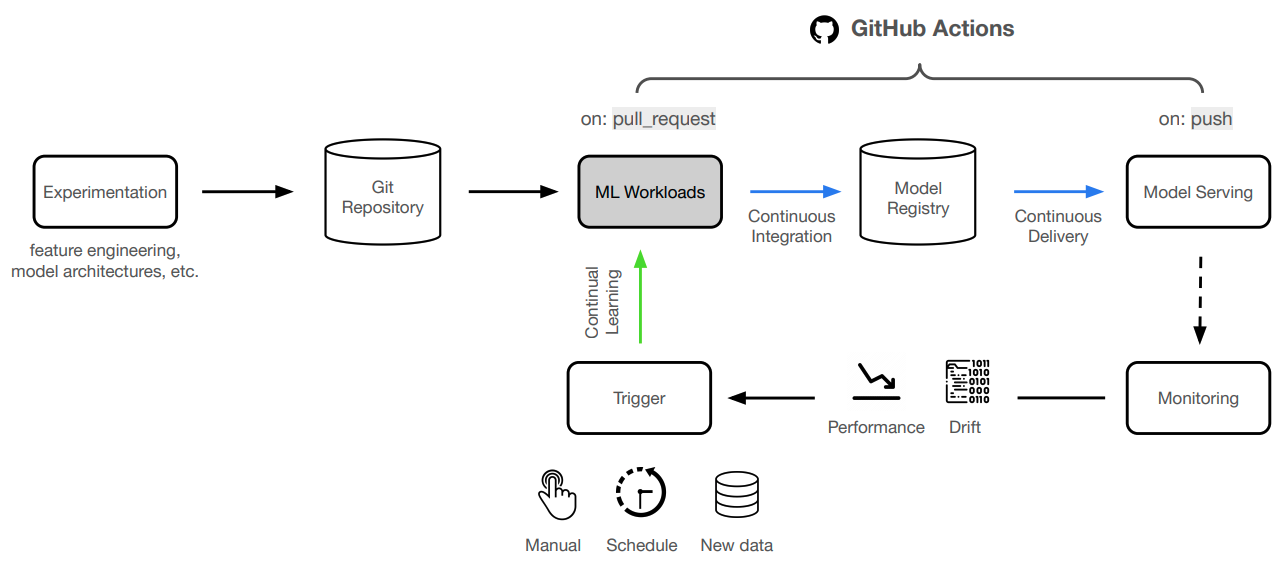
Continual learning
And with that, we're able to automatically update our ML application when ever we make changes to the code and want to trigger a new deployment. We have fully control because we can decide not to trigger an event (ex. push to main branch) if we're not satisfied with the results of our model development workloads. We can easily extend this to include other events (ex. new data, performance regressions, etc.) to trigger our workflows, as well as, integrate with more functionality around orchestration (ex. Prefect, Kubeflow, etc.), monitoring, etc.
Upcoming live cohorts
Sign up for our upcoming live cohort, where we'll provide live lessons + QA, compute (GPUs) and community to learn everything in one day.
To cite this content, please use:
1 2 3 4 5 6 | |