Setup
Repository · Notebook

Subscribe to our newsletter
📬 Receive new lessons straight to your inbox (once a month) and join 40K+ developers in learning how to responsibly deliver value with ML.
In this lesson, we'll setup the development environment that we'll be using in all of our lessons. We'll have instructions for both local laptop and remote scalable clusters (Anyscale). While everything will work locally on your laptop, you can sign up to join one of our upcoming live cohorts where we'll provide live lessons + QA, compute (GPUs) and community to learn everything in one day → sign up here.
Cluster
We'll start with defining our cluster, which refers to a group of servers that come together to form one system. Our clusters will have a head node that manages the cluster and it will be connected to a set of worker nodes that will execute workloads for us. These clusters can be fixed in size or autoscale based on our application's compute needs, which makes them highly scalable and performant. We'll create our cluster by defining a compute configuration and an environment.
Environment
We'll start by defining our cluster environment which will specify the software dependencies that we'll need for our workloads.
💻 Local
Your personal laptop will need to have Python installed and we highly recommend using Python 3.10. You can use a tool like pyenv (mac) or pyenv-win (windows) to easily download and switch between Python versions.
pyenv install 3.10.11  # install
pyenv global 3.10.11  # set default
Once we have our Python version, we can create a virtual environment to install our dependencies. We'll download our Python dependencies after we clone our repository from git shortly.
mkdir madewithml
cd madewithml
python3 -m venv venv  # create virtual environment
source venv/bin/activate  # on Windows: venv\Scripts\activate
python3 -m pip install --upgrade pip setuptools wheel
🚀 Anyscale
Our cluster environment will be defined inside a cluster_env.yaml file. Here we specify some details around our base image (anyscale/ray:2.6.0-py310-cu118) that has our Python version, GPU dependencies, etc.
1 2 3 4 5 6 7 8 9 10 11 12 | |
We could specify any python packages inside pip_packages or conda_packages but we're going to use a requirements.txt file to load our dependencies under post_build_cmds.
Compute
Next, we'll define our compute configuration, which will specify our hardware dependencies (head and worker nodes) that we'll need for our workloads.
💻 Local
Your personal laptop (single machine) will act as the cluster, where one CPU will be the head node and some of the remaining CPU will be the worker nodes (no GPUs required). All of the code in this course will work in any personal laptop though it will be slower than executing the same workloads on a larger cluster.
🚀 Anyscale
Our cluster compute will be defined inside a cluster_compute.yaml file. Here we specify some details around where our compute resources will come from (cloud computing platform like AWS), types of nodes and their counts, etc.
1 2 3 4 5 6 7 8 9 10 11 | |
Our worker nodes will be GPU-enabled so we can train our models faster and we set min_workers to 0 so that we can autoscale these workers only when they're needed (up to a maximum of max_workers). This will help us significantly reduce our compute costs without having to manage the infrastructure ourselves.
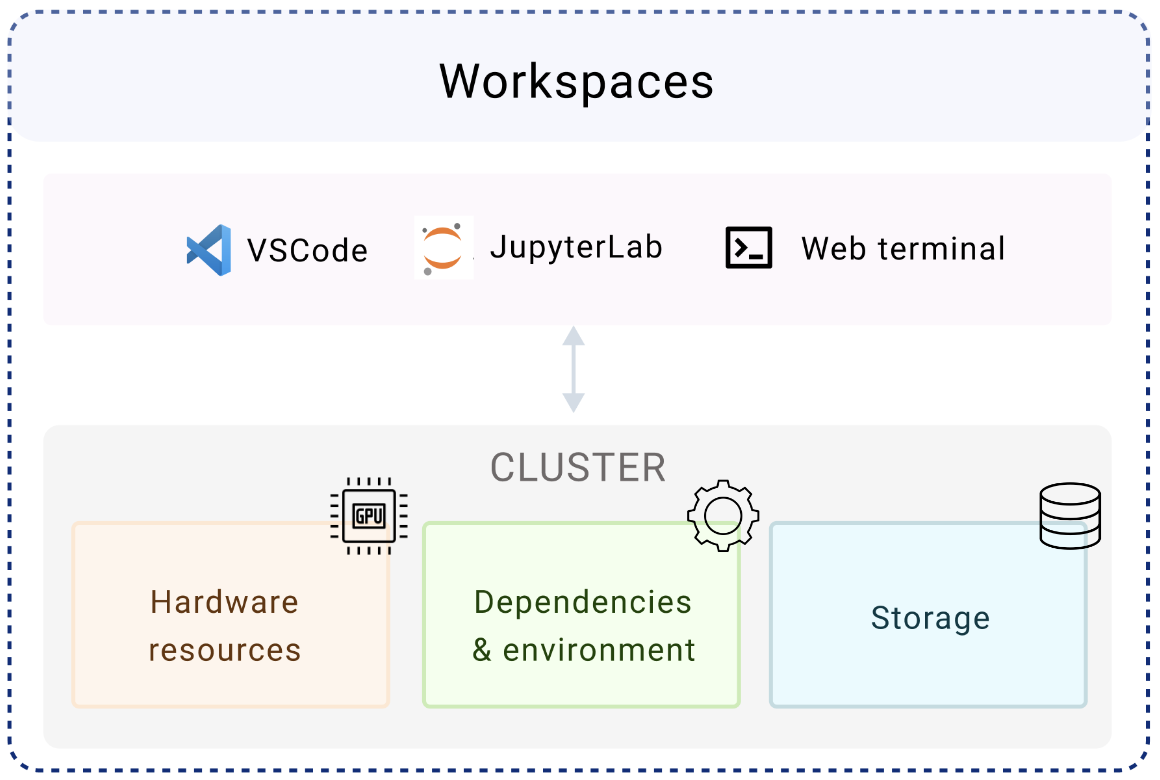
Workspaces
With our compute and environment defined, we're ready to create our cluster workspace. This is where we'll be developing our ML application on top of our compute, environment and storage.
💻 Local
Your personal laptop will need to have an interactive development environment (IDE) installed, such as VS Code. For bash commands in this course, you're welcome to use the terminal on VSCode or a separate one.
🚀 Anyscale
We're going to launch an Anyscale Workspace to do all of our development in. Workspaces allow us to use development tools such as VSCode, Jupyter notebooks, web terminal, etc. on top of our cluster compute, environment and storage. This create an "infinite laptop" experience that feels like a local laptop experience but on a powerful, scalable cluster.
We have the option to create our Workspace using a CLI but we're going to create it using the web UI (you will receive the required credentials during the cohort). On the UI, we can fill in the following information:
- Workspace name: `madewithml`
- Project: `madewithml`
- Cluster environment name: `madewithml-cluster-env`
# Toggle `Select from saved configurations`
- Compute config: `madewithml-cluster-compute`
- Click on the **Start** button to launch the Workspace
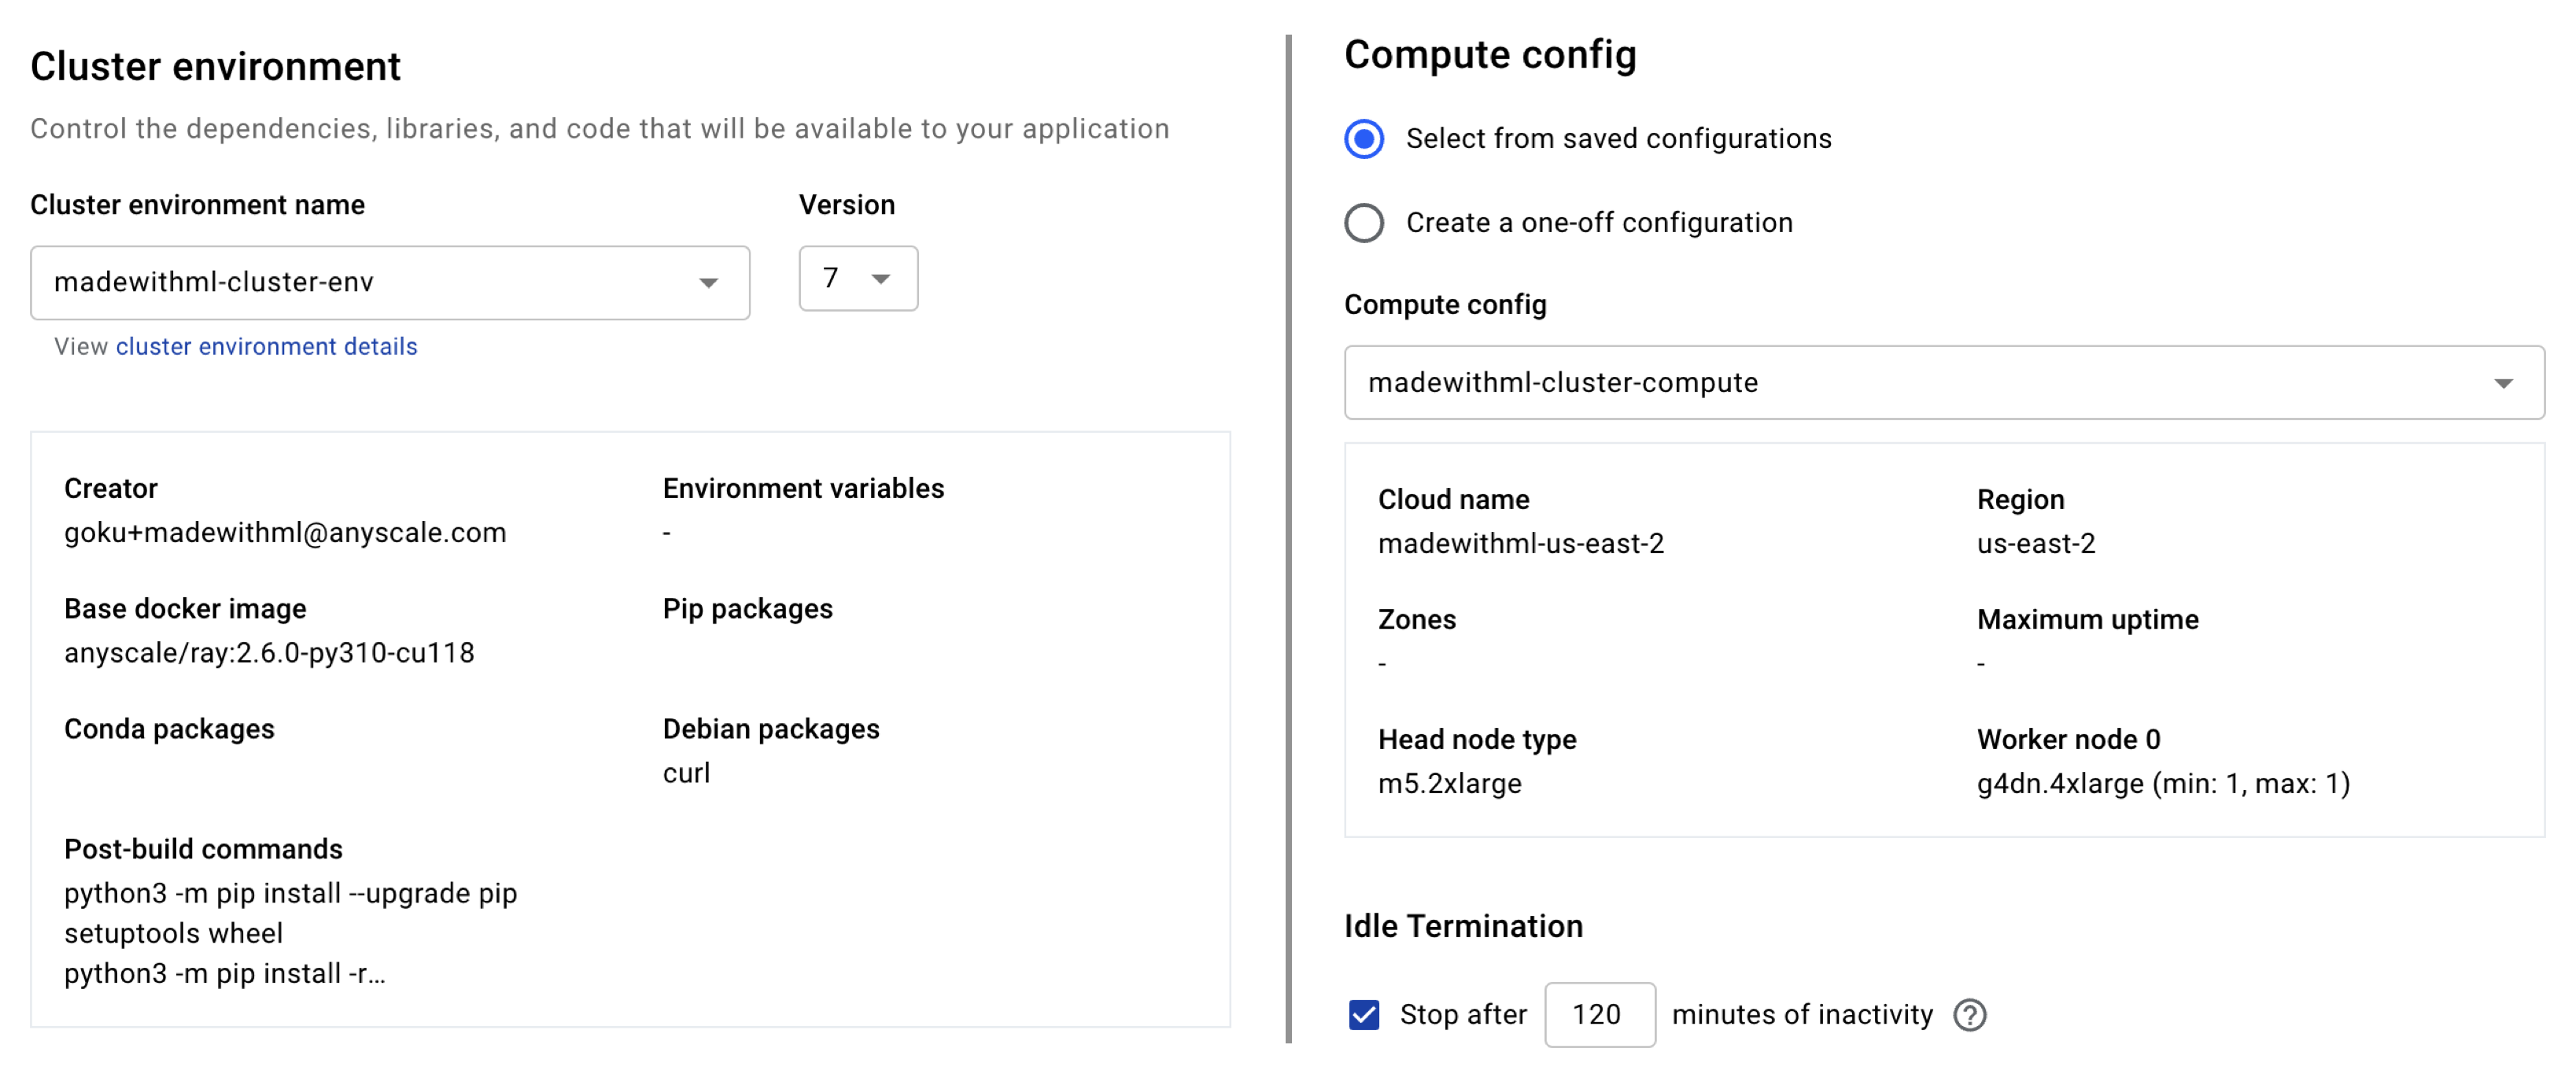
We have already saved created our Project, cluster environment and compute config so we can select them from the dropdowns but we could just as easily create new ones / update these using the CLI.
CLI method
# Set credentials
export ANYSCALE_HOST=https://console.anyscale.com
export ANYSCALE_CLI_TOKEN=$YOUR_CLI_TOKEN  # retrieved from Anyscale credentials page

# Create project
export PROJECT_NAME="madewithml"
anyscale project create --name $PROJECT_NAME

# Cluster environment
export CLUSTER_ENV_NAME="madewithml-cluster-env"
anyscale cluster-env build deploy/cluster_env.yaml --name $CLUSTER_ENV_NAME

# Compute config
export CLUSTER_COMPUTE_NAME="madewithml-cluster-compute"
anyscale cluster-compute create deploy/cluster_compute.yaml --name $CLUSTER_COMPUTE_NAME
Git
With our development workspace all set up, we're ready to start developing. We'll start by following these instructions to create a repository:
- Create a new repository
- name it
Made-With-ML - Toggle
Add a README file(very important as this creates amainbranch) - Scroll down and click
Create repository
Now we're ready to clone the Made With ML repository's contents from GitHub inside our madewithml directory.
export GITHUB_USERNAME="YOUR_GITHUB_UESRNAME"  # <-- CHANGE THIS to your username
git clone https://github.com/GokuMohandas/Made-With-ML.git .
git remote set-url origin https://github.com/$GITHUB_USERNAME/Made-With-ML.git
git checkout -b dev
export PYTHONPATH=$PYTHONPATH:$PWD  # so we can import modules from our scripts
💻 Local
Recall that we created our virtual environment earlier but didn't actually load any Python dependencies yet. We'll clone our repository and then install the packages using the requirements.txt file.
python3 -m pip install -r requirements.txt
Caution: make sure that we're installing our Python packages inside our virtual environment.
🚀 Anyscale
Our environment with the appropriate Python version and libraries is already all set for us through the cluster environment we used when setting up our Anyscale Workspace. But if we want to install additional Python packages as we develop, we need to do pip install with the --user flag inside our Workspaces (via terminal) to ensure that our head and all worker nodes receive the package. And then we should also add it to our requirements file so it becomes part of the cluster environment build process next time.
pip install --user <package_name>:<version>
Notebook
Now we're ready to launch our Jupyter notebook to interactively develop our ML application.
💻 Local
We already installed jupyter through our requirements.txt file in the previous step, so we can just launch it.
jupyter lab notebooks/madewithml.ipynb
🚀 Anyscale
Click on the Jupyter icon ![]() at the top right corner of our Anyscale Workspace page and this will open up our JupyterLab instance in a new tab. Then navigate to the
at the top right corner of our Anyscale Workspace page and this will open up our JupyterLab instance in a new tab. Then navigate to the notebooks directory and open up the madewithml.ipynb notebook.

Ray
We'll be using Ray to scale and productionize our ML application. Ray consists of a core distributed runtime along with libraries for scaling ML workloads and has companies like OpenAI, Spotify, Netflix, Instacart, Doordash + many more using it to develop their ML applications. We're going to start by initializing Ray inside our notebooks:
1 | |
1 2 3 4 | |
We can also view our cluster resources to view the available compute resources:
1 | |
💻 Local
If you are running this on a local laptop (no GPU), use the CPU count from ray.cluster_resources() to set your resources. For example if your machine has 10 CPUs:
{'CPU': 10.0,
 'object_store_memory': 2147483648.0,
 'node:127.0.0.1': 1.0}
num_workers = 6  # prefer to do a few less than total available CPU (1 for head node + 1 for background tasks)
resources_per_worker={"CPU": 1, "GPU": 0}
🚀 Anyscale
On our Anyscale Workspace, the ray.cluster_resources() command will produce:
{'CPU': 8.0,
'node:internal_head': 1.0,
'node:10.0.56.150': 1.0,
'memory': 34359738368.0,
'object_store_memory': 9492578304.0}
These cluster resources only reflect our head node (1 m5.2xlarge). But recall earlier in our compute configuration that we also added g4dn.xlarge worker nodes (each has 1 GPU and 4 CPU) to our cluster. But because we set min_workers=0, our worker nodes will autoscale ( up to max_workers) as they're needed for specific workloads (ex. training). So we can set the # of workers and resources by worker based on this insight:
# Workers (1 g4dn.xlarge)
num_workers = 1
resources_per_worker={"CPU": 3, "GPU": 1}
Head on over to the next lesson, where we'll motivate the specific application that we're trying to build from a product and systems design perspective. And after that, we're ready to start developing!
Upcoming live cohorts
Sign up for our upcoming live cohort, where we'll provide live lessons + QA, compute (GPUs) and community to learn everything in one day.
To cite this content, please use:
1 2 3 4 5 6 | |