Docker
Repository

Subscribe to our newsletter
📬 Receive new lessons straight to your inbox (once a month) and join 40K+ developers in learning how to responsibly deliver value with ML.
Intuition
The last step in achieving reproducibility is to deploy our versioned code and artifacts in a reproducible environment. This goes well beyond the virtual environment we configured for our Python applications because there are system-level specifications (operating system, required implicit packages, etc.) we aren't capturing. We want to be able to encapsulate all the requirements we need so that there are no external dependencies that would prevent someone else from reproducing our exact application.
Docker
There are actually quite a few solutions for system-level reproducibility (VMs, container engines, etc.) but the Docker container engine is by far the most popular for several key advantages:
- reproducibility via Dockerfile with explicit instructions to deploy our application in a specific system.
- isolation via containers as to not affect other applications that may also run on the same underlying operating system.
- and many more advantages including size (no separate OS needed for each application), speed, Docker Hub, etc.
We're going to use Docker to deploy our application locally in an isolated, reproducible and scalable fashion. Once we do this, any machine with the Docker engine installed can reproduce our work. However, there is so much more to Docker, which you can explore in the docs, that goes beyond what we'll need.
Architecture
Before we install Docker, let's take a look at how the container engine works on top our operating system, which can be our local hardware or something managed on the cloud.
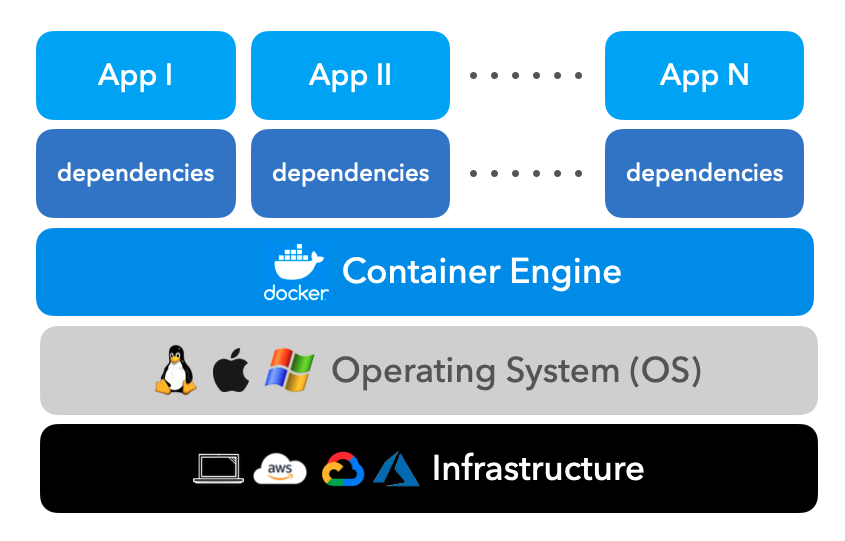
The Docker container engine is responsible for spinning up configured containers, which contains our application and it's dependencies (binaries, libraries, etc.). The container engine is very efficient in that it doesn't need to create a separate operating system for each containerized application. This also means that our containers can share the system's resources via the Docker engine.
Set up
Now we're ready to install Docker based on our operating system. Once installed, we can start the Docker Desktop which will allow us to create and deploy our containerized applications.
docker --version
Docker version 20.10.8, build 3967b7d
Images
The first step is to build a docker image which has the application and all it's specified dependencies. We can create this image using a Dockerfile which outlines a set of instructions. These instructions essentially build read-only image layers on top of each other to construct our entire image. Let's take a look at our application's Dockerfile and the image layers it creates.
Dockerfile
We'll start by creating a Dockerfile:
touch Dockerfile
The first line we'll write in our Dockerfile specifies the base image we want to pull FROM. Here we want to use the base image for running Python based applications and specifically for Python 3.7 with the slim variant. Since we're only deploying a Python application, this slim variant with minimal packages satisfies our requirements while keeping the size of the image layer low.
# Base image
FROM python:3.7-slim
Next we're going to install our application dependencies. First, we'll COPY the required files from our local file system so we can use them for installation. Alternatively, if we were running on some remote infrastructure, we could've pulled from a remote git host. Once we have our files, we can install the packages required to install our application's dependencies using the RUN command. Once we're done using the packages, we can remove them to keep our image layer's size to a minimum.
# Install dependencies
WORKDIR /mlops
COPY setup.py setup.py
COPY requirements.txt requirements.txt
RUN apt-get update \
    && apt-get install -y --no-install-recommends gcc build-essential \
    && rm -rf /var/lib/apt/lists/* \
    && python3 -m pip install --upgrade pip setuptools wheel \
    && python3 -m pip install -e . --no-cache-dir \
    && python3 -m pip install protobuf==3.20.1 --no-cache-dir \
    && apt-get purge -y --auto-remove gcc build-essential
Next we're ready to COPY over the required files to actually RUN our application.
# Copy
COPY tagifai tagifai
COPY app app
COPY data data
COPY config config
COPY stores stores

# Pull assets from S3
RUN dvc init --no-scm
RUN dvc remote add -d storage stores/blob
RUN dvc pull
Since our application (API) requires PORT 8000 to be open, we need to specify in our Dockerfile to expose it.
# Export ports
EXPOSE 8000
The final step in building our image is to specify the executable to be run when a container is built from our image. For our application, we want to launch our API with gunicorn since this Dockerfile may be used to deploy our service to production at scale.
# Start app
ENTRYPOINT ["gunicorn", "-c", "app/gunicorn.py", "-k", "uvicorn.workers.UvicornWorker", "app.api:app"]
There are many more commands available for us to use in the Dockerfile, such as using environment variables (ENV) and arguments (ARG), command arguments (CMD), specifying volumes (VOLUME), setting the working directory (WORKDIR) and many more, all of which you can explore through the official docs.
Build images
Once we're done composing the Dockerfile, we're ready to build our image using the build command which allows us to add a tag and specify the location of the Dockerfile to use.
docker build -t tagifai:latest -f Dockerfile .
We can inspect all built images and their attributes like so:
docker images
REPOSITORY   TAG       IMAGE ID       CREATED          SIZE
tagifai      latest    02c88c95dd4c   23 minutes ago   2.57GB
We can also remove any or all images based on their unique IDs.
docker rmi <IMAGE_ID>              # remove an image
docker rmi $(docker images -a -q)  # remove all images
Run containers
Once we've built our image, we're ready to run a container using that image with the run command which allows us to specify the image, port forwarding, etc.
docker run -p 8000:8000 --name tagifai tagifai:latest
Once we have our container running, we can use the API thanks for the port we're sharing (8000):
curl -X 'POST' \
  'http://localhost:8000/predict' \
  -H 'accept: application/json' \
  -H 'Content-Type: application/json' \
  -d '{
  "texts": [
    {
      "text": "Transfer learning with transformers for text classification."
    }
  ]
}'
We can inspect all containers (running or stopped) like so:
docker ps     # running containers
docker ps -a  # stopped containers
CONTAINER ID   IMAGE            COMMAND                  CREATED          STATUS    PORTS                    NAMES
ee5f1b08abd5   tagifai:latest   "gunicorn -c config…"    19 minutes ago   Created   0.0.0.0:8000->8000/tcp   tagifai
We can also stop and remove any or all containers based on their unique IDs:
docker stop <CONTAINER_ID>      # stop a running container
docker rm <CONTAINER_ID>        # remove a container
docker stop $(docker ps -a -q)  # stop all containers
docker rm $(docker ps -a -q)    # remove all containers
If our application required multiple containers for different services (API, database, etc.) then we can bring them all up at once using the docker compose functionality and scale and manage them using a container orchestration system like Kubernetes (K8s). If we're specifically deploying ML workflows, we can use a toolkit like KubeFlow to help us manage and scale.
Debug
In the event that we run into errors while building our image layers, a very easy way to debug the issue is to run the container with the image layers that have been build so far. We can do this by only including the commands that have ran successfully so far (and all COPY statements) in the Dockerfile. And then we need to rebuild the image (since we altered the Dockerfile) and run the container:
docker build -t tagifai:latest -f Dockerfile .
docker run -p 8000:8000 -it tagifai /bin/bash
Once we have our container running, we can use our application as we would on our local machine but now it's reproducible on any operating system that can run the Docker container engine. We've covered just what we need from Docker to deploy our application but there is so much more to Docker, which you can explore in the docs.
Production
This Dockerfile is commonly the end artifact a data scientist or ML engineer delivers to their DevOps teams to deploy and scale their services, with a few changes:
- data assets would be pulled from a remote storage location (ex. S3).
- model artifacts would be loaded from a remote model registry.
- code would be loaded from a remote repository (ex. GitHub) via
git clone.
All of these changes would involve using the proper credentials (via encrypted secrets and can even be automatically deployed via CI/CD workflows. But, of course, there are subsequent responsibilities such as monitoring.
Upcoming live cohorts
Sign up for our upcoming live cohort, where we'll provide live lessons + QA, compute (GPUs) and community to learn everything in one day.
To cite this content, please use:
1 2 3 4 5 6 | |