Git

Subscribe to our newsletter
📬 Receive new lessons straight to your inbox (once a month) and join 40K+ developers in learning how to responsibly deliver value with ML.
Intuition
Whether we're working individually or with a team, it's important that we have a system to track changes to our projects so that we can revert to previous versions and so that others can reproduce our work and contribute to it. Git is a distributed versional control system that allows us do exactly this. Git runs locally on our computer and it keeps track of our files and their histories. To enable collaboration with others, we can use a remote host (GitHub, GitLab, BitBucket, etc.) to host our files and their histories. We'll use git to push our local changes and pull other's changes to and from the remote host.
Git is traditionally used to store and version small files <100MB (scripts, READMEs, etc.), however, we can still version large artifacts (datasets, model weights, etc.) using text pointers pointing to blob stores. These pointers will contain information such as where the asset is located, it's specific contents/version (ex. via hashing), etc.
Set up
Initialize git
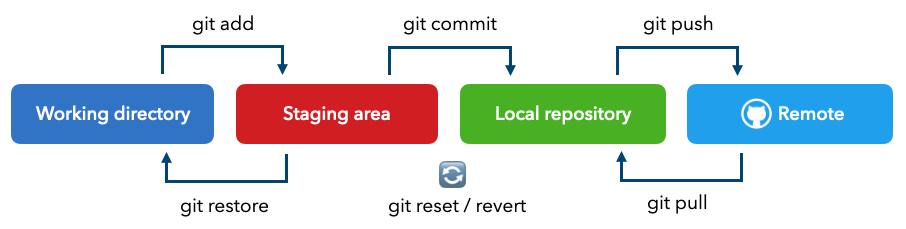
Initialize a local repository (.git directory) to track our files:
git init
Initialized empty Git repository in /Users/goku/Documents/madewithml/MLOps/.git/
We can see what files are untracked or yet to be committed:
git status
On branch main No commits yet Untracked files: (use "git add..." to include in what will be committed) .flake8 .vscode/ Makefile ...
.gitignore
We can see that we have some files that we don't want to push to a remote host, such as our virtual environment, logs, large data files, etc. We can create a .gitignore file to make sure we aren't checking in these files.
touch .gitignore
We'll add the following files to the file:
# Data
logs/
stores/
data/

# Packaging
venv/
*.egg-info/
__pycache__/

# Misc
.DS_Store
For now, we're going to add data to our .gitignore file as well but this means that others will not be able to produce the same data assets when they pull from our remote host. To address this, we'll push pointers to our data files in our versioning lesson so that the data too can be reproduced exactly as we have it locally.
Tip
Check out our project's .gitignore for a more complete example that also includes lots of other system artifacts that we would normally not want to push to a remote repository. Our complete .gitignore file is based on GitHub's Python template and we're using a Mac, so we added the relevant global file names as well.
If we run git status now, we should no longer see the files we've defined in our .gitignore file.
Add to stage
Next, we'll add our work from the working directory to the staging area.
- We can add one file at a time:
git add <filename> - We can add all files at once:
git add .
Now running git status will show us all the staged files:
git status
On branch main No commits yet Changes to be committed: (use "git rm --cached..." to unstage) new file: .flake8 new file: .gitignore new file: Makefile ...
Commit to repo
Now we're ready to commit the files in the staging area to the local repository. The default branch (a version of our project) will be called main.
git commit -m "added project files"
[main (root-commit) 704d99c] added project files
 47 files changed, 50651 insertions(+)
 create mode 100644 .flake8
 create mode 100644 .gitignore
 create mode 100644 Makefile
 ...
The commit requires a message indicating what changes took place. We can use git commit --amend to edit the commit message if needed. If we do a git status check we'll see that there is nothing else to commit from our staging area.
git status
On branch main
nothing to commit, working tree clean
Push to remote
Now we're ready to push the updates from our local repository to a remote repository. Start by creating an account on GitHub (or any other remote repository) and follow the instructions to create a remote repository (it can be private or public). Inside our local repository, we're going to set our username and email credentials so that we can push changes from our local to the remote repository.
# Set credentials via terminal
git config --global user.name <USERNAME>
git config --global user.email <EMAIL>
# Check credentials
git config --global user.name
git config --global user.email
Next, we need to establish the connection between our local and remote repositories:
# Push to remote
git remote add origin https://github.com/<USERNAME>/<REPOSITORY_NAME>.git
git push -u origin main  # pushing the contents of our local repo to the remote repo
                         # origin signifies the remote repository
Developing
Now we're ready to start adding to our project and committing the changes.
Cloning
If we (or someone else) doesn't already have the local repository set up and connected with the remote host, we can use the clone command:
git clone <REMOTE_REPO_URL> <PATH_TO_PROJECT_DIR>
And we can clone a specific branch of a repository as well:
git clone -b <BRANCH> <REMOTE_REPO_URL> <PATH_TO_PROJECT_DIR>
<REMOTE_REPO_URL>is the location of the remote repo (ex. https://github.com/GokuMohandas/Made-With-ML).<PATH_TO_PROJECT_DIR>is the name of the local directory you want to clone the project into.
Create a branch
When we want to add or change something, such as adding a feature, fixing a bug, etc., it's always a best practice to create a separate branch before developing. This is especially crucial when working with a team so we can cleanly merge our work with the main branch after discussions and reviews.
We'll start by creating a new branch:
git checkout -b <NEW_BRANCH_NAME>
We can see all the branches we've created with the following command where the * indicates our current branch:
git branch
* convnet
main
We can easily switch between existing branches using:
git checkout <BRANCH_NAME>
Once we're in a branch, we can make changes to our project and commit those changes.
git add .
git commit -m "update model to a convnet"
git push origin convnet
Note that we are pushing this branch to our remote repository, which doesn't yet exist there, so GitHub will create it accordingly.
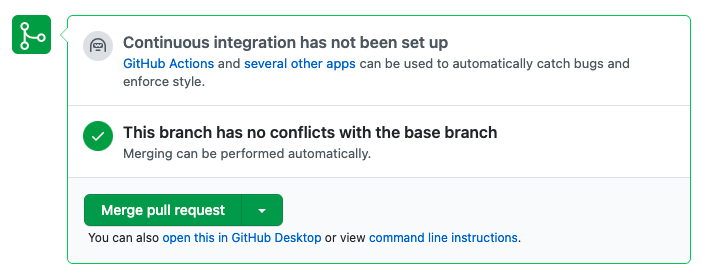
Pull request (PR)
When we push our new branch to the remote repository, we'll need to create a pull request (PR) to merge with another branch (ex. our main branch in this case). When merging our work with another branch (ex. main), it's called a pull request because we're requesting the branch to pull our committed work. We can create the pull request using steps outlined here: Creating a pull request.
Note
We can merge branches and resolve conflicts using git CLI commands but it's preferred to use the online interface because we can easily visualize the changes, have discussion with teammates, etc.
# Merge via CLI
git push origin convnet
git checkout main
git merge convnet
git push origin main
Pull
Once we accepted the pull request, our main branch is now updated with our changes. However, the update only happened on the remote repository so we should pull those changes to our local main branch as well.
git checkout main
git pull origin main
Delete branches
Once we're done working with a branch, we can delete it to prevent our repository from cluttering up. We can easily delete both the local and remote versions of the branch with the following commands:
# Delete branches
git branch -d <BRANCH_NAME>  # local
git push origin --delete <BRANCH_NAME>  # remote
Collaboration
So far, the workflows for integrating our iterative development has been very smooth but in a collaborative setting, we may need to resolve conflicts. Let's say there are two branches (a and b) that were created from the main branch. Here's what we're going to try and simulate:
- Developer A and B fork the
mainbranch to make some changes - Developer A makes a change and submits a PR to the
mainbranch. - Developer B makes a change to the same line as Developer A and submits a PR to
main. - We have a merge conflict now since both developers altered the same line.
- Choose which version of the code to keep and resolve the conflict.
When we try to merge the second PR, we have to resolve the conflicts between this new PR and what already exists in the main branch.
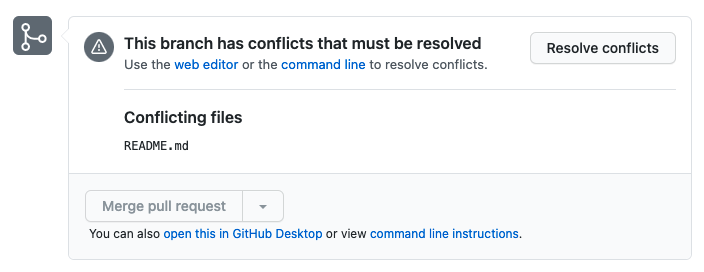
We can resolve the conflict by choosing which content (current main which merged with the a branch or this b branch) to keep and delete the other one. Then we can merge the PR successfully and update our local main branch.
<<<<<< BRANCH_A
<CHANGES FROM BRANCH A>
======
<CHANGES FROM BRANCH B>
>>>>>> BRANCH_B
Once the conflicts have been resolved and we merge the PR, we can update our local repository to reflect the decisions.
git checkout main
git pull origin main
Note
We only have a conflict because both branches were forked from a previous version of the main branch and they both happened to alter the same content. Had we created one branch first and then updated main before creating the second branch, we wouldn't have any conflicts. But in a collaborative setting, different developers may fork off the same version of the branch anytime.
A few more important commands to know include rebase and stash.
Inspection
Git allows us to inspect the current and previous states of our work at many different levels. Let's explore the most commonly used commands.
Status
We've used the status command quite a bit already as it's very useful to quickly see the status of our working tree.
# Status
git status
git status -s  # short format
Log
If we want to see the log of all our commits, we can do so using the log command. We can also do the same by inspecting specific branch histories on the Git online interface.
# Log
git log
git log --oneline  # short version
704d99c (HEAD -> main) added project files
Commit IDs are 40 characters long but we can represent them with the first few (seven digits is the default for a Git SHA). If there is ambiguity, Git will notify us and we can simply add more of the commit ID.
Diff
If we want to know the difference between two commits, we can use the diff command.
# Diff
git diff  # all changes between current working tree and previous commit
git diff <COMMIT_A> <COMMIT_B>  # diff b/w two commits
git diff <COMMIT_A>:<PATH_TO_FILE> <COMMIT_B>:<PATH_TO_FILE>  # file diff b/w two commits
diff --git a/.gitignore b/.gitignore
index 288973d..028aa13 100644
--- a/.gitignore
+++ b/.gitignore
@@ -1,7 +1,6 @@
 # Data
 logs/
 stores/
-data/
Blame
One of the most useful inspection commands is blame, which allows us to see what commit was responsible for every single line in a file.
# Blame
git blame <PATH_TO_FILE>
git blame -L 1,3 <PATH_TO_FILE>  # blame for lines 1 and 3
Time travel
Sometimes we may have done something we wish we could change. It's not always possible to do this in life, but in the world of Git, it is!
Restore
Sometimes we may just want to undo adding or staging a file, which we can easily do with the restore command.
# Restore
git restore -- <PATH_TO_FILE> <PATH_TO_FILE> # will undo any changes
git restore --stage <PATH_TO_FILE>  # will remove from stage (won't undo changes)
Reset
Now if we already made the commit but haven't pushed to remote yet, we can reset to the previous commit by moving the branch pointer to that commit. Note that this will undo all changes made since the previous commit.
# Reset
git reset <PREVIOUS_COMMIT_ID>  # or HEAD^
HEADis a quick way to refer to the previous commit. BothHEADand any previous commit ID can be accompanied with a^or~symbol which acts as a relative reference.^n refers to the nth parent of the commit while~n refers to the nth grandparent. Of course we can always just explicitly use commit IDs but these short hands can come in handy for quick checks without doinggit logto retrieve commit IDs.
Revert
But instead of moving the branch pointer to a previous commit, we can continue to move forward by adding a new commit to revert certain previous commits.
# Revert
git revert <COMMIT_ID> ...  # rollback specific commits
git revert <COMMIT_TO_ROLLBACK_TO>..<COMMIT_TO_ROLLBACK_FROM>  # range
Checkout
Sometimes we may want to temporarily switch back to a previous commit just to explore or commit some changes. It's best practice to do this in a separate branch and if we want to save our changes, we need to create a separate PR. Note that if you do checkout a previous commit and submit a PR, you may override the commits in between.
# Checkout
git checkout -b <BRANCH_NAME> <COMMIT_ID>
Best practices
There so many different works to work with git and sometimes it can became quickly unruly when fellow developers follow different practices. Here are a few, widely accepted, best practices when it comes to working with commits and branches.
Commits
- Commit often such that each commit has a clear associated change which you can approve / rollback.
- Try and squash commits if you have multiple before pushing to the remote host.
- Avoid monolithic commits (even if you regularly stash and rebase) because it can cause many components to break and creates a code review nightmare.
- Attach meaningful messages to commits so developers know exactly what the PR entails.
- Use tags to represent meaningful and stable releases of your application.
# Tags git tag -a v0.1 -m "initial release" - Don't delete commit history (reset), instead use revert to rollback and provide reasoning.
Branches
- Create branches when working on a feature, bug, etc. because it makes adding and reverting to the
mainbranch very easy. - Avoid using cryptic branch names.
- Maintain your
mainbranch as the "demo ready" branch that always works. - Protect branches with rules (especially the
mainbranch).
Tags
Leverage git tags to mark significant release commits. We can create tags either through the terminal or the online remote interface and this can be done to previous commits as well (in case we forgot).
# Tags
git tag  # view all existing tags
git tag -a <TAG_NAME> -m "SGD"  # create a tag
git checkout -b <BRANCH_NAME> <TAG_NAME>  # checkout a specific tag
git tag -d <TAG_NAME>  # delete local tag
git push origin --delete <TAG_NAME>  # delete remote tag
git fetch --all --tags  # fetch all tags from remote
Tag names usually adhere to version naming conventions, such as
v1.4.2where the numbers indicate major, minor and bug changes from left to right.
Upcoming live cohorts
Sign up for our upcoming live cohort, where we'll provide live lessons + QA, compute (GPUs) and community to learn everything in one day.
To cite this content, please use:
1 2 3 4 5 6 | |